Showing posts with label He Said ~ She Said. Show all posts

Wednesday, July 10, 2013

Mixing and matching collections - Far & Away and He Said, She Said by Amanda

Our family recently went on a mini-vacation and although we stayed away, we weren't too far from home. I wanted to use some travel product from Far and Away but as we didn't go far I wanted the theme to be more focused on summer fun. I decided to use a few pieces from the Far and Away line and mix them with the fun colors in the He Said, She Said line.


I cut out a few phrases and journaling spots from the Far and Away papers, along with the portion of the map paper which shows the UK. I arranged them with my photos to create a block in the centre of my page. For some pops of colour I layered up some die-cut flowers from He Said, She Said and arranged them with some brads around the central block.


Lastly I added a strip of patterned paper along the top and bottom of the layout, with the awesome arrow striped washi tape peeking out from underneath. I love how versatile this travel line is - the neutral colours in the papers mean you can dress it up with almost anything to perfectly suit your trip!

Have you been mixing Teresa's collections? We'd love to see your layouts, don't forget to post your projects on our Facebook page and you could be featured here on the blog!

Happy scrapping!
Amanda


Tuesday, June 25, 2013

Background Techniques with Decorative Tape by Tessa Wise

Hello!

Today I want to share some cards I created using one of my favorite products, Decorative Tapes!  I love them!  For these cards, I mixed and matched the tapes from all the winter and spring lines- they work so well together!  Here is my first card:


I created a layered look with the tapes on this one.  I layered one piece horizontal then one vertical, ect. until I filled the background up with washi.  Layering them like this gives it sort of a woven look.  I stamped a sentiment on a circle punched out of one of the fun patterns from the Stationery Noted line.  I added a couple decorative brads from the He Said She Said line along with a bit of linen thread tied in a bow to finish off the look.


This technique looks great as a scrapbook layout background, too!

For my next card, I pinched bits of the washi as I layed it down to create a tabby textured background:


I varied the placement of my tabs as I worked but kept them all the same size.  To finish this one off, I punched another circle out of the same patterned paper and added a bit of the red tape.  I added the chipboard sentiment next and then a couple of brads, all from the He Said She Said line.  I wrapped the card with a bit of linen thread and added the circle on top of it.


Don't you love that saying?  I couldn't help but us it!

For my last card, I used the mosaic technique, cutting off bits of the tape with my scissors.  The scissors give it a straight edge that resembles tiles:


I stamped my sentiment on the patterned paper from the Stationery Noted line and then embellished it with a die cut banner, a chipboard banner, and a few black epoxy dots.  I finished off this look with my linen thread tied in a bow over the banners.


Don't you love how all the tapes look together?  The collections all work so well with each other!

Since these cards are all about the techniques, I thought I'd make a quick video for you visual learners! :)  Bear with me though- I'm a beginner videographer...


I hope I've inspired you to reach for your decorative tapes the next time you want to try a fun background technique!

Supplies Used:

Teresa Collins Designs:
Stationery Noted 6x6 Designer Pad, Stationery Noted Epoxy Dots, He Said She Said- She Said Decorative Brads, He Said She Said- She Said Die Cut Accessories, He Said She Said- She Said Chipboard Elements, He Said She Said- She Said Decorative Tape, He Said She Said- He Said Decorative Tapes, Stationery Noted Decorative Tapes, Far and Away Decorative Tapes, Memories Decorative Tape, Summer Stories Decorative Tape
Other:
Sentiment stamps, ink, cardstock, circle punch, linen thread by Stampin' Up!; Mists by Studio Calico

Thanks for joining me today!

Wednesday, June 19, 2013

Summer photo decor by Amanda Jones

Hi there everyone! Summer has finally found us here in the UK so I was inspired to create this little decor project with the Summer Stories collection and an inexpensive wooden clipboard.


As my clipboard was intended to be a bingo clipboard it had stuff printed all over the front, so to start with I gave it a couple coats of white paint. I added a few dabs of ink in colours which would coordinate with the product I was using, to distress it a little and tone down the bright white paint. 


I layered journaling cards from the cut-apart paper sheet with the banner and some stickers and adhered them to the board. My photos are just held on by the clip so that I can switch them out for something different as summer goes on.


In addition to papers and embellishments from the Summer stories collection I embellished the board with some flowers and the sewn banner from the He Said She Said line.


Do you have any summer projects planned for your home? We'd love to see them if you do - just link them here or on our Facebook page!

Have a great day!
Amanda


Wednesday, June 5, 2013

Making Arrows by Stacey Michaud

Are you looking to add embellishments to your page?  I have some tips for you today that might make the process easier to manage.  Arrows are a hot trend right now in the scrapbooking world.  I will show you how to create your very own version of arrows, using patterned paper as inspiration.

I am in love with the particular sheet of paper called Arrows from the He Said, She Said line.

I decided to cut out my favorite colors and layer up the arrows to create a one-of-a-kind border.  Here is my page.


I layered each arrow, placing foam dots under some of them.  It give dimension and depth.  I topped some of the arrows with enamel dots to give it interest and movement..  Hand cutting elements allows you to make embellishments that fit your page and your scale.  


I added other fun, hand cut designs to the page like the honeycomb.  Using small pieces of journaling cards and the patterned papers allows for layering.   For example, I grabbed the green and white journaling card, placed the jagged edge die-cut circle in the middle and topped it with a piece of chipboard the reads "You are So Beautiful".  I tied off a button to give it the final touch.  Scissors and your imagination go a long way!

Supplies:  He Said, She Said (Paper:  Arrows, Postcard, Dots, Borders, Buttons, Die-cuts, Stickers, Enamel Dots, Brads)


Tuesday, June 4, 2013

A Few Cards by Tessa Wise

Hello and happy Tuesday! I love making cards and lately, I've been making even more then usual! Today I have four to share with you. For these cards, I mostly used the He Said She Said line, adding in a few bits and pieces from other lines here and there. Here is my first card:


I started this card by cutting lengths of the garland and adhering them to the left side of the card. Next, I stamped my sentiment onto vellum with Versamark ink and heat embossed it using white embossing powder. I adhered it to the card front using the green washi tape and to add a little stability to the vellum, I added the scallop and red patterned strip to the edges. Lastly, I embellished it with the pretty red enamel dots.


I am such a fan of white heat embossing- especially on vellum! Just be careful when you're heating it up- it melts so much faster then on regular cardstock!

My next card is a clean and simple design. I used the banners from the She Said die cuts sheet to draw your eye straight to the happy sentiment:


To create this card, you'll need a white card base. Cut a white panel of cardstock the same size as your card front (5.5x4.25") and emboss it. Cut a bit off the top digagonally and adhere it to your card front. Add your banners next, overlapping them just a little. Stamp your sentiment on to gray cardstock with Versamark ink and heat emboss it using white powder. Add it to your card over the seam between the embossed panel and smooth card front using dimensional foam dots. Last, add a length of twine, finishing in a bow directly above the sentiment. Let the tails hang underneath the sentiment strip.


This one may be simple but I love how it turned out! The twine and embossing add texture while the banners and diagonal lines add interest.

Card number three has a modern shabby chic look to it. I've added a little garland from the Memories line on this one:


For this card, I started by stamping the hearts from the She Said stamp set onto the kraft background using Versamark. Next, I splattered some shimmer spray over the top of them. When it was dry, I adhered a doily folded in half to the front. I stamped the sentiment in brown ink and added two banners from the He Said She Said- She Said die-cut sheet. Next, I added the garland, adhering it only on the two aqua pieces so that it hangs loosely on the card. I finished it off with the linen thread, wrapping it around the card front twice and finishing in a bow.


The best part of this card is the movement of the garland- it hangs over the edge and is such a fun element!

I have one more for you! For this one I used the He Said She Said- She Said die cut flowers as my focal point:


To recreate this card, start with a textured white card base. Cut a panel of the black print from the Summer Stories 6x6 designer pad and matt it with yellow cardstock. Adhere it to the center of your card front. Create your tag out of the blue flower journaling card found on the He Said She Said- She Said die-cut sheet. To make it into a tag, just cut off the top corners. Add a strip of patterned paper over the words and adhere the tag onto the card front. Choose a flower from the He Said She Said-She Said die-cut flowers and adhere it to your card using dimensional foam adhesive. Punch a circle out of a coordinating patterned paper and add a brad to it before adhering it to the center of the flower using another dimensional foam dot. Finish it off by embellishing with green epoxy dots, a pretty coral button, and your sentiment.


I love how the tag and flowers look over the black patterned paper. They really pop!

I really enjoyed creating these cards! The best part though will be  sending them in the mail to a few of my favorite people! I don't always send my cards out but I don't know why- I love getting cards in the mail!

Supplies Used:

Teresa Collins Designs:
He Said She Said- She Said 6x6 Designer Pad, He Said She Said- He Said 6x6 Designer Pad, Summer Stories 6x6 Designer Pad, He Said She Said- She Said Decorative Brads, He Said She Said- She Said Epoxy Dots, He Said She Said- She Said Die Cut Accessories, He Said She Said- She Said Decorative Tape, He Said She Said- She Said Clear Stamp Set,  He Said She Said- She Said Decorative Buttons, He Said She Said- She Said Die Cut Flowers, He Said She Said- She Said Garland, Memories Garland
Other:
Sentiment stamps, ink, cardstock, doilies, scallop punch, embossing folder, linen thread by Stampin' Up!; Mists by Studio Calico; Baker's twine by The Twinery; sticker sentiment by SRM Stickers; sentiment stamps by Lawn Fawn

Thanks for joining me today!


Wednesday, May 29, 2013

He Said... layout by Amanda Jones


Hi everyone! I am here today to share with you this layout I created with the He Said line...


I always make a note of the little things my son says that make me giggle. This collection is perfect for creating simple pages which highlight those funny snippets of conversation from eveyday life which just need to be documented! 

I recently moved from having my studio at home to having a space elsewhere, so now during school breaks my son often goes there with me when I have work to do. The day I created this layout, my son had been particularly excited to go there with the promise of using my paints ;) All the way there in the car he was babbling about how much he wanted to do some "abstract arting". He's a cutie, lol!


I used the arrow border stamp to create a border along the edge of the washi tape strip.


To balance the page I added a cluster of elements including the pop of red, the washi tapes and paper I'd used elsewhere on the page.

And yes... he did get to do some "abstract arting" that day...


Ah, splatters. This kid sure takes after his Mum!

Thanks for stopping by!

Amanda

MY BLOG

Friday, May 17, 2013

Guest Designer Leslie Ashe!

It has been so fun to get to know and watch Leslie for quite some time. Leslie creates beautiful layouts and is very inspiring. It was a perfect match to ask her to be a guest on the blog. Thank you Leslie!

Here are her gorgeous layouts:
Summer Stories collection - I love how she uses black ink on her layouts!


 He said, She said collection - I love her details and how she cut the flowers paper and traced them, so pretty!


 He said, She said collection - I love how she cut apart so many of the pieces and check out the layers on layers!


 Summer Stories collection - The details in this are amazing... did you notice the enamel dots cluster in the honeycomb paper, staples on the photo, washi tape as layers... so creative!


Wow!  Here's a little about Leslie:

Leslie Ashe is a born & bred Texan girl who loves to create memories with her family & put them on paper to remember always. 
She began scrapbooking over 16 years ago after going to a craft party with friends. Creating is her one and only true outlet.
Not a day goes by when she’s not sitting in her studio (that her husband helped her put together recently) working away.
When she’s not creating, you can find her curled up with a good book, with her family or out snapping all the memories she can get in a day.
She’s blessed to have work published in Scrapbook Trends, Cards, Simply Handmade, Create:  Idea Books, Creating Keepsakes magazines.
She currently serves on the following Design Teams:  American Crafts, Pink Paislee, Lily Bee Design, Prima, Noel Mignon Kit Club & Paper Issues. 
You can find her blog here:  http://leslieashe.blogspot.com/
Follow her on Twitter:  Leslie Ashe, Facebook:  Leslie Ashe, Pinterest:  Leslie Ashe & Instagram:  Leslie Ashe (http://instagram.com/leslieashe)


Leslie is THRILLED to be a guest for Teresa Collins! She thanks everyone for this amazing opportunity!

Thank you again Leslie, amazing work as always!

Tuesday, April 16, 2013

Double Your Pleasure by Stacey Michaud


There are times when I want to work in a format bigger than 12 X 12.  I might have several photos of the same event and really want to showcase them with just the right amount of embellishments!  Times like those call for a double pager.

I work in 12 X 12, but many times I love creating with double 8.5 X 11 pages.  It allows for a bit more room, yet keeps pages manageable!

Here is a page I created.


When making double page layouts, I always like to have a main focal point.  I make it bold enough to draw the eye in.  For this page, it was the sun.  It highlights my favorite picture on the page.  The large tag on the other side has enough weight to bring the eye over.  I often like to use the same backgrounds on both sides so the whole page is grounded. 


To make the sun, I cute the diagonal strips from the Stripes paper from He Said, She Said.  I then laid them out like rays and added some enamel dots for dimension.

Supplies:  He Said, She Said:  Arrows, Strips and Flowers Paper, Borders, Brads, Enamel Dots; Far & Away:  Chipboard

Double page layouts come in many shapes and sizes...try one today!


Friday, April 12, 2013

Arizona Adventure Mini Book - with Julie


Hi everyone!
Awhile back I shared a travel journal I made with the bigger stitched notebook from the Far & Away line.  You'd be so proud of me...I kept it in my purse and filled it up with what we did each day on our Arizona vacation last month.  
It was fun for journaling...and now it helps me remember all those details I was SURE I would never forget. 

I got my photos back from the trip and decided to do a mini with them.  I mostly used the He Said line...but there's pieces of She Said and Far & Away too.

The cover is a clear/acetate page cut to 5x7.  Awhile ago Michaels had those fun glitter letters...so I grabbed a couple of J's (Julie Jacob...I'm stuck with J!)  I added one to the cover for our family name...along with some little bits and pieces...like my airplane ticket stub.

This page is also 5x7.  I made it in Photoshop.  I like how it comes through behind the acetate page.

The left side is the back of the above picture...so it's 5x7.  The next little piece is a file folder from He Said.

Don't be afraid to add stuff that didn't actually, strictly, technically come from your trip!
The little Arizona is a puzzle piece...and the fact card came out of an old game found at the thrift store.  

Here is the inside of the file folder.  I did some journaling by hand...and some on my old typewriter as well.
For fun, dig out your sewing machine and start stitching!  It doesn't matter if it shows through on the back.

The back of the file folder is on the left...I added a little 3x4 card I made in Photoshop. :)
The Starbucks page on the right is smaller...4x5.

The page on the right is a big file folder cut down a bit for my book.  
I think the big Grand Canyon sticker is supposed to go on the back of a car...but I bought it for my book. :)

The inside of the file page...I added a receipt and another photo.  You could also sew the top and bottom to make a pocket page, if you didn't want it to open up.

On the right are two 4x6 photos adhered together...

I didn't want to add too much stuff to the Grand Canyon photo...let's face it... The GC is pretty darn amazing all on its own.   The right side is a post card.

I dooded up the back of the post card...and added another large post card on the right.  

The left side is actually the paper e-ticket from the Royals-Mariners baseball game we attended.
The Mariners lost.  But that's ok.  We're used to it. ;)

I punched the tab for the left side, and added a photo from our trip to the zoo.
Well, the zoo gift shop.  It was SO hot the day we went.  I think they close the zoo at 2pm.  I couldn't understand why until I realized it was for the HEAT.  Holy cow...the poor melty animals.

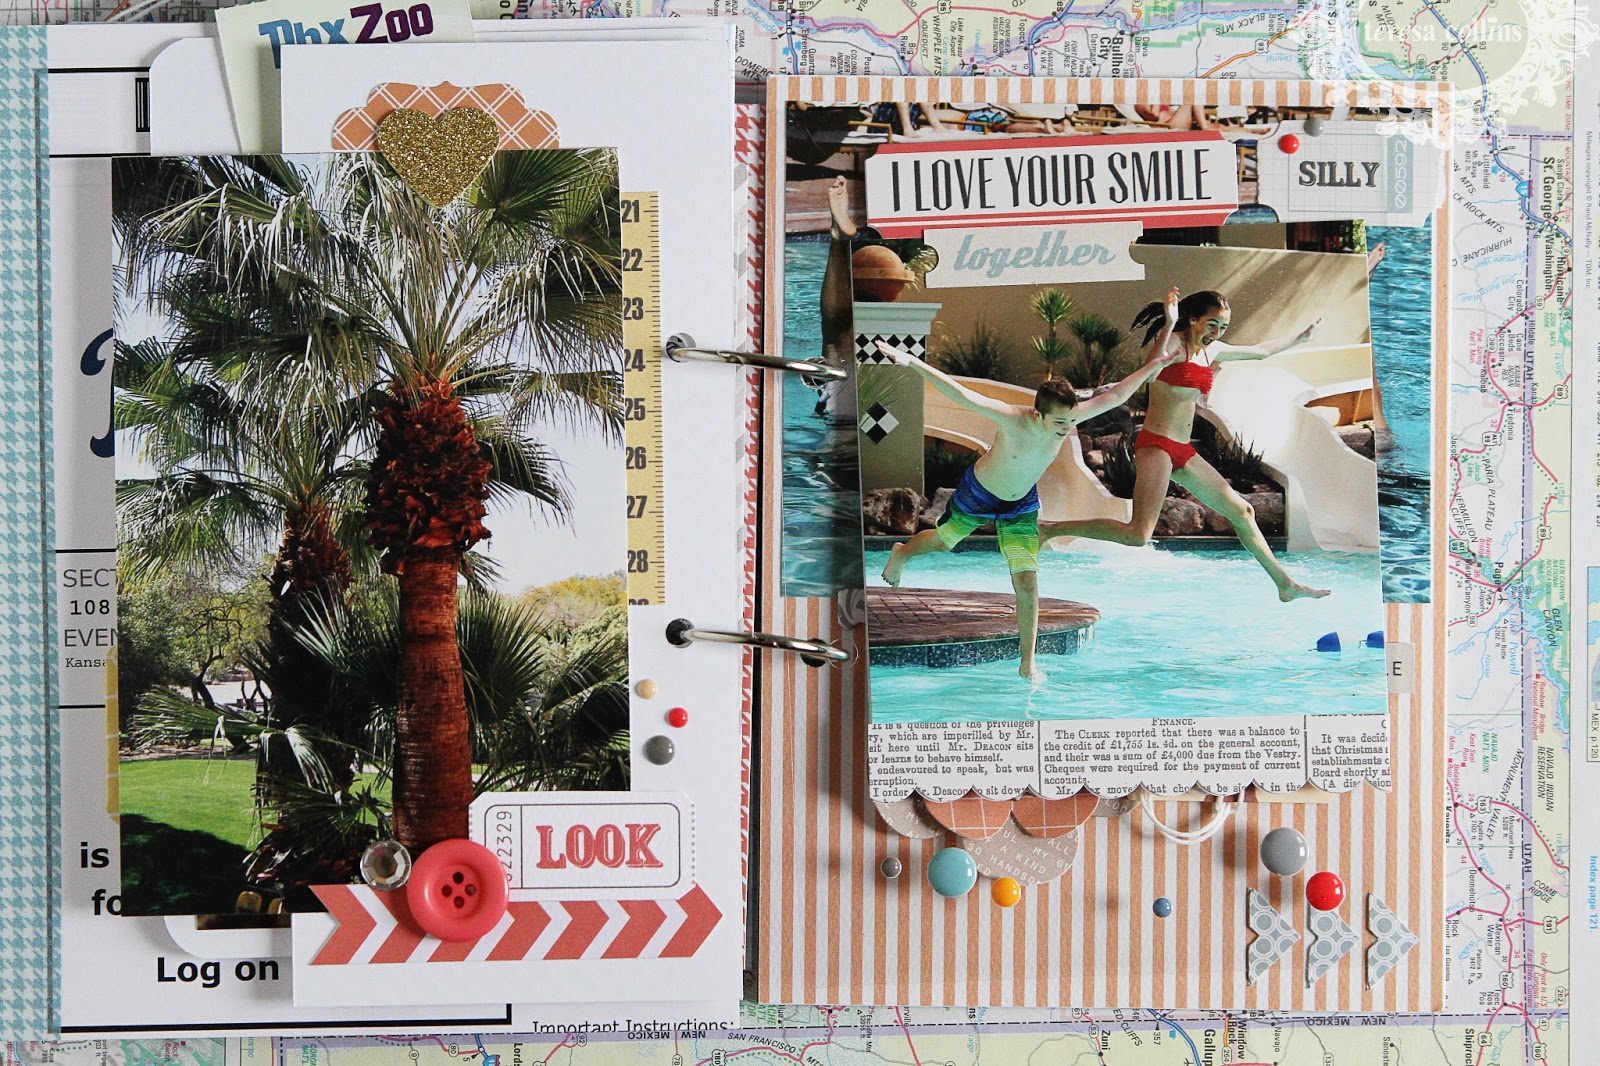
The rest of our trip was in Scottsdale.  My husband had a conference to attend...so the kids & I hit the pool every day. :)  The page on the right is another acetate clear page.  I just cut my photos to the same size, so the backs wouldn't show from either side.  I added the enamel dots the same way.

So the page on the left is clear...you can see through to the pages behind it.  Make sense?
And the right side is the end!  Whew...you made it!

I love to layer those flowers with chipboard pieces and brads...
Thanks for reliving my Arizona trip with me...and for those of you who live there....lucky ducks!!! :)

Related Posts Plugin for WordPress, Blogger...