Showing posts with label gift ideas. Show all posts

Tuesday, December 10, 2013

Quick and Easy gift ideas by Yvonne Blair


Hello there.  I don't know about you I cannot believe Christmas is in 15 days! Crazy.
We all have those things crop up where we need a quick gift. 
You know what I'm talking about.  
I decided to share with you some things I have made up for just that occasion. 

Here I bought a few Starbucks Holiday Mugs and stuffed them with hot chocolate and peppermint sticks to dip in the hot chocolate.  I also used a Teresa Collins Santa's list treat bag as a little gift card holder. 
It contains a Starbucks Gift card to stuff in the mug along with the other goodies. 
If you haven't bought any of these treat bags yet...what are you waiting for???
The small ones are the perfect size to create a unique gift card holder.
I took to epoxy dots and stuck them on a foam pop dot. Folded the top of the treat bag down and stuck the popped epoxy dots on the bag as well as the fold.  Then you just tie a little piece of baker's twine add a punch out from the die cut sheet and there you have it.  A really quick and easy gift. 
I think these would be great for teachers, co-workers or that unexpected guest that always seems to happen.
 Next I took one of the bigger treat bags, adhered a doily, stamped the "to-from" and tied it all together with some more Baker's Twine. They you can just stuff it with whatever you have on hand. 
Wouldn't this be cute to take to the Kid's Christmas party at school???

 Last but certainly not least, I ran one of the transparent treat bags through the TCeBosser.
I think this is the perfect way to dress it up a bit.  
Love the Stardust folder...it has been really used a LOT lately, hehehe.
Folded the bag down, attached a folded doily and punched out the Santa's List from a piece of the packaging. I love to use as much as possible...sometimes the packaging has some really cute elements on them. 
 I hope you enjoyed today's quick and easy in a pinch post! 
Until next time! Have a safe and happy week! 
I hope to get some Christmas shopping done and crossed off my list! 
What about you???

Tuesday, May 7, 2013

Gift Card Holders tutorial featuring Summer Stories by Yvonne Blair


Hi everyone!  Yvonne here to show you a quick and easy gift card holder. 
You could use these for any quick, last minute or emergency gift.  
We are using them for Breanna's end of the year teacher gifts. 
She is a senior and graduating.
She has some teachers that really have touched her heart and made a huge difference in not just her life, but the lives of all the students who were in their classes.  I appreciate all their hard work and dedication to molding the minds of the future.  
I hope you enjoy this little tutorial.  

First, you want to cut Summer Stories Stripes to 4 x 12 inch strips.  
 You will then turn it 90degrees and cut the floral strip off at the red line.
 Here are the two pieces you will have. 
 Next, fold up from the bottom edge to the top of the black quarterfoil pattern 
 Then you will fold that edge back down so just the yellow floral strip is showing. 
(you will have to excuse my inky fingers...stained from National Scrapbook day, lol)
 Punch a hole in the center of the yellow floral strip to thread the ribbon through. 
 Sorry this one got a little blurry but you get the picture.  Thread the ribbon through the hole.
The ribbon will wrap around the back and meet at the center of the front where you will thread through the hole and pull it through.  
Next, apply some adhesive to the sides of the fold up part.  (Just to secure it so the gift card will not slip out.) 
 This is what is should look like at this point.  Using the floral strip you cut off at the beginning,
cut inch strips to make two pennants.  Punch out Thank You from the die cut sheet and apply foam tape.
 Apply pennants and Thank You punch out to front of card.  
I love the enamel dots and used those to imitate brads.  
I also backed the card with Black cardstock to help it pop and be a tad stronger.  
 So hear is the finished card.  Perfect to tuck a little gift card for a nice surprise for the recipient.  
I did leave a little room at the top left corner for Bre to hand write a thank you to her teacher. 
Who wouldn't love that???  
 I hope you enjoyed this quick and easy idea.  I have found myself in the need of something like this a time or two.  Now I have a few made up just in case, wink.  
I hope Bre's teachers will enjoy this as much as I enjoyed making them for them.  

Supplies Used:
Teresa Collins Summer Stories Stripes paper
Summer Stories Die Cut sheet
Summer Stories Enamel Dots
Doily, Bazzill ribbon and cardstock
Teresa Collins Mega Runner from Xyron
Foam tape. 

Hope you all have a great week! Until next time.  
If you would like to visit my blog click here

Monday, March 4, 2013

Easter Party Decor by Stacey Michaud & winner from last week!


Hi everyone!  I love to create my own party decorations using my scrapbooking supplies.  It is an easy way to use up your stash and add creative, special touches to any event.

Today, I am sharing some Easter party decorations with you.  I love to set a pretty table and these goodies will help me achieve that while helping me stick to a budget.

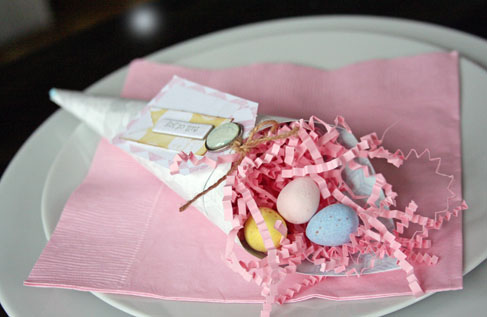
To add a lovely touch to each plate, I made several paper cones.  I used a combination of collections, but focused mainly on Sweet Afternoon since the pastels really match my party.


I placed pink shredded paper in each cone and added some candy.  These cones were easily to make.  I started with a 6X6 square and turned it on a diagonal.  Then, holding onto the bottom cone, I rolled the right hand side in.  I added adhesive and then rolled the left hand side, adjusting until I had a cone.  Since the paper is heavy, I used dabs of liquid glue to secure it.


Each cone received different treatment.  I used brad, chipboard, die-cuts and buttons to decorate.  A little goes a long way!  I tied each one off with burlap trim from Tell Your Story as it adds a natural touch.


See the table centerpiece behind that cone?  It was super easy to achieve using washi tape, ribbon and a button.


I grabbed my metal container from Ikea and wrapped a piece of color coordinated washi tape (Tell Your Story) around the top.  I then tied the pretty cream ribbon around and placed a button in the center!

You can make these party decorations using any of Teresa's beautiful collections.  Imagine a bon voyage theme using Far and Away?  My daughter saw the cones and squealed!  Guess I will be making some for her April birthday party!

Happy decorating!

Congratulations to our WINNER from Last Week's Drawing : 

Celeste B.


Please email Sesil your information at sesil@teresacollinsdesigns.com.


Wednesday, May 23, 2012

Lowri McNabb and Sandy Ang with Artfull Crafts Blog Swap

Today we have TWO amazing designers from Artful Crafts with us today. We have the amazing Lowri McNabb and Sandy Ang with us today. So let's get started with LOWRI:

__________________________________________

Hi Everyone – Lowri from Artfull Crafts here to share some projects using the fabulous Everyday Moments Collection. The colors in this collection are fabulous and the papers are very versatile. 


Journal Album


I have created this blank journal album using a combination of plain white cardstock and papers from
the collection.


The wonderful colors really stand out against the plain card and each page has some journaling prompts
for the recipient to start writing.


I have bound the book cover with an eyelet and bakers twine which wraps around a brad to keep the
book closed.

Card and Matching Envelope


The base of this card was cut using my Cameo and this file, and I have kept the additional decoration
quite simple. To create the bird I brushed some white ink over the wooden piece and then stamped over
the top with a clock-face stamp.


The matching envelope was also die-cut using this file here, and I used two of the Everyday Moments Brads and some bakers twine for an office-style closure.


Gift Boxes


I also made these gift boxes using this gorgeous collection – this is just a small sample, and you can see all of them on the A Little Hut blog.

I hope you have enjoyed these ideas – please swing by my blog to see heaps more!


______________________________


Hi I'm Sandy Ang from the sunny, little island of Singapore. A card-maker, scrapper and off-the-page project creator. I love playing with lines and shapes to produce layered, textural and often dimensional items. My style varies depending on the supplies I'm working with. It ranges from classic to quirky and eclectic.

Since wedding season is just round the corner and vacation season coming after that, I thought I’d share two wedding cards and the cover of a travel journal created for Artfull Crafts. I appreciate how Teresa Collins designs products that are beautifully classic and timeless. On each project I’ve mixed and matched supplies across various collections. 


I have more Teresa Collins cards and a mini-book here. Hope you’ll drop by to check them out. Thank you Sesil for the opportunity to share my projects on the Teresa Collins Design Team blog.
__________________________________________

Thank you ladies for sharing your amazing talent with us. Make sure to "like" Artfull Crafts at: facebook.com/artfullcrafts and tell them Teresa Collins sent you.  


Related Posts Plugin for WordPress, Blogger...