Showing posts with label tags. Show all posts

Tuesday, May 20, 2014

Urban Market Glam - Melissa Phillips

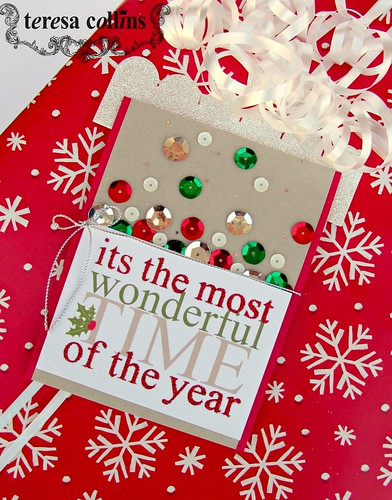
The new Urban Market collection is so elegant and classic, filled with trendy elements, glitter, shimmer, and glamour.  It's a favorite of mine and today I've got a couple of projects using this collection to share with you, beginning with this altered paper mache star box.

I covered the outside edges with Urban Market Decorative Tape and then chose glittered patterned paper for the top.  I used die cut feathers and a wood shape to bring in some trendy elements, and then layered chipboard to create my focal point.  

A few lovely, large Urban Market silver sequins were added last and as usual, are always a perfect finishing touch. 
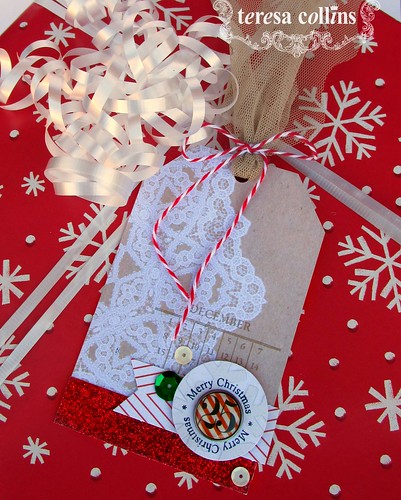
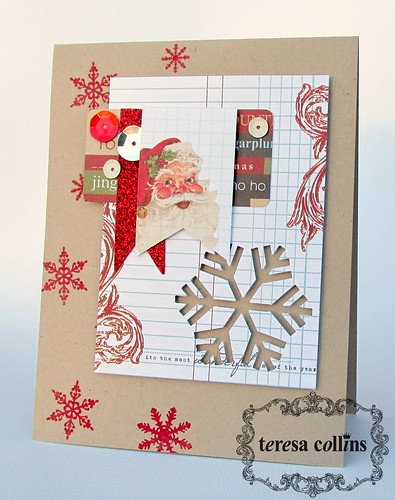
I had so much fun with this card using the 6x6 Urban Market Paper Pad and die cut tag.  All that is needed with the lovely patterns and colors in this collection are a few finishing touches.

A bit of chipboard stapled down the side and across the front using my Xyron/Teresa Collins stapler, die cut stars cut from Urban Market paper, a brad, and a few enamel dots...so easy to put these products together.

And, last but not least, more Urban Market Decorative Tape across the bottom...what did we ever do before this wonderful, fun stuff?  I love the patterns included in each of Teresa's decorative tape collections...must haves for sure!
Thanks for visiting.
Melissa Phillips

Monday, May 19, 2014

Something Wonderful Tag book by Cheri Piles

Hey everyone! I am in love with the new mid release collection "Something Wonderful"!! I love all of the bright fun colors and I thought it would be perfect for a class to teach this summer at my local stores. So, this is a huge sneak peak of my upcoming class!

It's all about tags!! I have a lot of people ask how I would use the tags from the collections and after some thought this is what I came up with. I wanted a mini book that is MORE than just a tag book, so I added a few pages, doilies, flaps and LOTS of layers!! It's such a neat and different book!

The tags that come in the tag package are incredible and are pretty even just by themselves. 

Here, I created a pocket page with my photo and have a pull tag coming out of it. 

Here is a really large "Library pocket" type of page with a tag on the front and a tag that comes out of the pocket. 

I love this page, I used the tag as my title on the page! I love that scrapbooking has no rules!

Here is another Library pocket page with more tags, I think they are one of my fav's in the book. 

I love the look of this one with the photo layered over the tag. The pictures from our trip to the tulip farm on Easter were perfect for this book. 

This book is great on it's own but I wanted to showcase it in a different way so I took the glass out of a picture frame, backed it with one of the collections paper, added a cup hook to the top center and hung my book on it. It makes such an impression!! I hope you are inspired to think outside the box, mini books come in all shapes and sizes!

Enjoy your day and be sure to check out Teresa's blog - she is at the NYC Stationary Show this week debuting her new collection Studio Gold and announced yesterday her new partnership with CANON!! www.teresacollinsdesignsblog.com

~Cheri


Friday, April 11, 2014

Shabby, Sweet Cards & Tag - Melissa Phillips

Shabby, Sweet Cards & Tag - Melissa Phillips

Hello there.  I'm happy to be back with you today sharing a few cards made with the ever so lovely Daily Stories and Save the Date collections.  These are both so beautiful on their own, but easy and effortless to combine together.

My first card uses Teresa Collins papers with my die cuts to create a flower filled with layers of patterns, colors, paper, and trims.  I also used Decorative Tape across the bottom of my card to bring in some of the pink found in the papers, and attached my flower, wood piece, chipboard, and brad to a die cut tag.  These make such great focal points.

 I finished by adding a few Enamel Dots to add some fun and whimsy.  
This card as well as the tag that follows were both created for the Scrapbook Generations online magazine and are based on sketch you can find there.  Their sketches are amazing, so detailed, and so much fun to play around with.

Daily Stories was used here again and I couldn't stop myself from adding bits of everything including, Decorative Tape, chipboard, Enamel Dots, die cuts, and stamping using the sweet Daily Stories collection.

It was so much fun being challenged to stray from my usual design style and incorporate some circles for a change.  

Shown here is my tag for Scrapbook Generations using the Save the Date collections and once again I  used a little bit of everything.  

I made my sentiment just a bit playful by adding a button in to the mix of chipboard letters.  And, the fun die cut banners and sequins create lots of movement and playfulness, but as with anything Teresa Collins creates, all things combined create a very elegant feel.  
Enjoy your day and thanks for visiting.

Tuesday, December 17, 2013

Tags and Cards for Christmas by Tessa Wise

Hello!  Only a few more days until Christmas and I've been busy wrapping up gifts.  I love to make special tags and cards for my packages- it adds a special touch to each gift I give.  Here are a few that I made this year:

Gift Card Tag

The first one is a gift card holder tag.  I cut an extra long piece of cardstock and folded one end up to create a pocket.  It holds the cute Starbucks gift card perfectly!  This one is embellished with the cute postal label stamp, some of the fun border strips, a chipboard button, and a few epoxy dots- all from the Santa's List collection.
25 Tag

My next tag was quick- I started with the doily journaling card and embellished the bottom with a glittery red border strip.  Next, I stamped the calendar above the border strip with brown ink.  I added a punch out banner flag next and then stamped and punched the sentiment onto the snowflake patterned paper.  I added the decorative brad next and adhered it to my tag with a foam dot.  Lastly, I added a few sequins for sparkle.

I have a couple cards to share, too!  Here is my first one:

Santa Card 2

I started this one with a kraft card base.  I started by stamping the snowflakes up one side of the card with red ink.  Next, I added the journaling card with the snowflake punched out.  I added some punch outs and banner flags to the left corner of the journaling card next and then added a few sequins as accent.

My last one is a fun one using more of those pretty sequins:

Wonderful Christmas Card

I loved this journaling card and knew it would be a fun sentiment on a card!  I created a red card base for it and then added a strip of kraft cardstock to the center.  I added my sentiment card next and wrapped it with a bit of silver cording, finishing it with a bow.  I started adding the sequins next, starting close to the sentiment card.  I added fewer and fewer as I went up.  Lastly I went back and added the glitter bits- they are the centers from the silver sequins that I found in the baggy- don't they look pretty mixed in?  :)

I add my cards to the front of my packages using a card hanger die- who needs an envelope with this:

Present Card

Now my gifts have a little extra wow and I can check the present wrapping off my list!  Hope you are all enjoying the season and thanks for joining me today!

Supplies Used:
Teresa Collins Designs: Santa's List 12x12 papers,  Santa's List Sequins, Santa's List Chipboard Buttons, Santa's List Epoxy Dots, Santa's List Border Strips, Santa's List Die-cut Sheet, Santa's List Decorative Brads, Santa's List clear stamp set
Other: Cardstock by Stampin' Up!; Twine by The Twinery; Snowflake punch by Stampin' Up!; Ribbon by Stampin' Up!; Card Hanger Die by Soapbox Creations

Thursday, December 5, 2013

Teresa Collins eBosser 'In Time for the Holidays' Blog Hop! Advent Tutorial by Cheri Piles

Hey Everyone! I'm back with the tutorial, on how to create tags just like these using the Santa's List 6"x6" paper pad. See diagrams below for papers used from the paper pad.
You will need to have brad numbers, white or cream cardstock, ribbon - I used red and cream and some flowers. To see how I created these flowers I have a flower tutorial here. Pop dots and ink if you like to ink, which is optional. I used distress stain in gathered twigs. And a tray, I used the 7gypsies Mini Librarie drawer, my tags are measured in width for this tray. If you use a different one measure your tag bases (white cardstock) to fit your tray.

OK, so I have given you a little diagram on how I cut all of the papers. I did have some left over, so heck if your feeling like going for the whole month you can! *tip - you can corner round all of your peices... or not. I did with the exception of the dark red and music notes strips (some I turned into banners as shown on tags in first post), I like the look of the rounded corners but it's a personal choice and it's yours. :)


Now, for the words... I don't have an image of it, but there is a sheet in your paper pad that has phrases on them. Cut them all apart. Also cut apart the journal cards from the pad.

From your white card stock you will need to make your tags. All of my tags are 2 3/4" wide, so cut a bunch of 2 3/4" strips. Now, from those strips cut 5 at 3 1/2" tall, 5 at 3 3/4" tall, 5 at 4" tall, 5 at 4 1/4" tall and 5 at 4 1/2". Then cut all your top corners into angles for all of your tags.

Once you have all of your tags created then emboss them, and as you can see I had some extra room so I added a few of the papers and embossed them too!
So, once I embossed them all I gave them just a bit of ink (as in lightly, to give a LITTLE bit of contrast) Then I ink stained all of the edges. Ok, so by #25 I HOPE you still like me.... maybe you should have some chocolate... right now I'm finishing my second bag of DOVE Chocolate Peppermint Bark Promises!!

Here's a little tip or trick....
If you only want to emboss half of or a part of something just insert the part you want embossed. Now think about this for just a sec... what if this was a card? Yes, you could emboss just the front, fold it over and voila!! *Tip - when you put it into the machine, just make sure the flappy part hanging out of the folder is at the bottom not the top when you insert the plates into your TCeBosser.


ok, so start assembling your tags, refer back to the FIRST POST which has close up pictures! Because they are tags I think you can see how to add your paper layers. Don't forget to make this more special by adding advent items to the back of each tag. I hope you are inspired to create your own advent countdown tags!


If you want to be entered to win the fabulous giveaway you make sure you leave a comment on each participating blog in the hop.  Craftwell is giving away a TC eBosser with two of her new folders!!!
*TO BE CONSIDERED FOR THE GIVEAWAY, YOU MUST LEAVE A COMMENT ON EACH OF THE PARTICIPATING BLOGS. 1 COMMENT PER PERSON, PER BLOG, PER DAY.  

*You can enter the giveaway everyday by commenting on at least one of the participating blogs, and selecting the 'left a comment' tab on Rafflecompter. Limit is 1 comment per person, per day. All entries left on all blogs, will go to into the same 'hat'.

a Rafflecopter giveaway In the mean time...hop on over to the next on the list! 

Craftwell -  starting link
Sam   
                                                               Misty Christensen
TCD Design Team -you are here


Friday, June 21, 2013

Summer Stories Tag Embellishment with Stacy Rodriguez

Good morning everyone, Stacy here with you on this fabulous Friday!  I going to share a tag with you that I created using Summer Stories.  I LOVE to make tags because you can use them on so many things.  They are perfect to tie on any gift bag, add to a layout, slip them in a mini album with some journaling or photos on them.....the possibilities are endless!  If you think about it, it is kind of like making your own embellishment!

Here is what my finished tag looks like.


So to start this tag I took a Ranger manila tag #8 and simply cut the pattern paper to the size of the tag.  I placed the paper on the tag with my pink Teresa Collins Xyron Mega Runner.  I took a different pattern paper from the collection and cut it a little smaller then placed that in the center of the tag.  That is pretty much the base of the tag, and now it's just time for the fun part and make it your own by embellishing it.

So on the photo above you see the bottom of the tag.  I used the super fun camera decorative tape and wrapped it around the sides and then embellished above the tape with some enamel dots, buttons and chipboard stickers.  Toward the top of that photo you see that I cut a small boarder piece and placed that across what is the center of the tag.  I love the little bingo cards from the pattern paper and placed that there.  I added one of the brads and some flowers also.


At the top of the tag I placed a chipboard banner piece and some enamel dots.  Punched a hole in the top and tied some pretty May Arts ribbon through the top.

This is a fun way to use up your scrap pieces of paper while creating your own one embellishment for any project.

Thanks so much for stopping by, hope you have a wonderful day!


Friday, May 3, 2013

Tags & a Card by Keisha


Happy Friday! Keisha blogging today with a couple of tags & a card made using the new Summer Stories line. I focused on using my favorite papers from the line-my TOP fave is the black/white pattern!   


I am so into graphic black/white pattern paper these days, and I always want to add a strong pop of color when I use it (like the neon coral thread).


I am also a sucker for notebook pattern paper; it is something I often hoard in my stash.

Then I love the yellow pattern papers from the line and the sweet pink damask. !


Forgive me if you see me use these papers over and over and over again & together!!

Make sure you visit the Design Team Blog tomorrow May 4th on National Scrapbooking Day. We are giving away a Collection pack from the new line Summer Stories!!


Have a happy weekend TCD fans!


Related Posts Plugin for WordPress, Blogger...