Showing posts with label Cricut. Show all posts

Thursday, September 20, 2012

Wanna know a secret?


Thank you so much for all of your comments, this contest is closed. Winners announced on Facebook fan page. Thank you again!!

Shhhh----DECEMBER 25th--a new Cricut Seasonal Cartridge by Teresa Collins!!! 

That is right! Teresa has designed a Cricut Seasonal Cartridge that will be coming out as a Hello Thursday launch in November. However, our friends at Provo Craft told us that it will be available on www.cricut.com sometime today. The name is December 25th and it is THE perfect cartridge to inspire you--Teresa Collins style--to start working on Christmas cards, gifts and home decor.  

Check out the ADORABLE holiday themed projects our design team made using the Teresa Collins December 25th cartridge! 

Guest Designer: Candice Bunnage

Supplies:
·     Teresa Collins December 25th Cartridge
Teresa Collins Christmas Cottage paper
·      Cardstock
·      3 Cardboard cones. Various sizes
·      3D Dots

Instructions:
·      Wrap large cone with desired paper and secure
·      Cut Frame at 3 inches. Glue onto center of largest tree
·      Cut JOY at 2 inches. Glue onto center of frame
·      Cut Snowflake 4 at 3 inches. Secure to top of tree
·      Wrap smaller cone with desired paper and secure
·      Cut snowflake border at 1 inch, 1.5 inch. And 2 inches.
·      Glue onto cone and secure
·      Wrap smaller cone with desired paper and secure
·      Cut Dove at 1.5 inches x5
·      Secure onto cone with 3D Dots


Instructions:
·      Prepare image on Cricut Craft Room
·      Flip image so it is backwards on screen
·      Using iron-on glitter vinyl, cut “Ho Ho Ho” image at 11 inches.
·      Weed out excess vinyl
·      Iron on gently using cotton setting of iron


Joy Cut Sizes:
Joy: 3"
Sleigh: 1 3/4
Snowflakes: 2 1/4, 2", 3 3/4
December: 2 1/4


Holiday sparkle cut sizes:
Sparkle: 4 inches
Snowflakes:2 3/4
Holiday: 2"
stocking: 3 3/4


cuts:
FlrDeLis 3 1/2" Countdown paper side b
SantaFrm 4"  Sentiments side b paper
Deer 3 1/2" Countown side b paper
Mistltoe 2 3/4 Sentiments side b paper
Holly 2 1/2"  Sentiments side b paper
HollyLr 2 1/2" Red Snowflakes paper
Ornament 4"  Tiny flowers side b paper
Sparkle 2 1/2" Tiny Flowers side b paper
Snwflke5 1 1/2" (x3) Countdown side b paper
Joy 3" Medallion side b paper
Snwflke 3" Snowflakes paper
SnwflkLr 3" Snowflakes paper side b

Other Christmas Cottage items used: 
Washi tape
Buttons
Decorative Brads
Trim
Chipboard #1

page 1 :
FlrDeLis 3 1/2" Countdown paper side b, Ink around all edges using brown ink.
Layer your cut circle onto music notes paper. 
Adhere your Fleur De Lis using pop dots. 
Adhere a 1 inch strip of burlap using hot glue and ruffle along back as you are gluing.
Add 3 small gems to center of fleur de lis. 

page 2:
SantaFrm 4"  Sentiments side b, ink around edges in green ink.
Deer 3 1/2" Countown side b, ink around edges using brown ink.
Mistltoe 2 3/4 Sentiments side b, ink around edges using green ink, add red drops of red glaze or red stickles to berry parts.
Adhere frame to music notes tag, add a small bling to right and left of frame circles. 
Adhere deer using pop dots. 
Adhere Mistletoe to bottom right of frame overhanging right edge of tag. 
Adhere cream antlers Christmas Cottage button overlapping where mistletoe meets the frame and bottom of deer's right foot. 
Add red chipboard sticker fleur de lis to center of button.

page 3:
Holly 2 1/2"  Sentiments side b, ink around all edges in green ink.
HollyLr 2 1/2" Red Snowflakes, add red glaze or red stickles to berries and glue berries to holly.
Ornament 4"  Tiny flowers side b, add red glaze or red stickles to stripes. Ink around edges in brown ink.
Tie jute string around top of ornament. Adhere ornament to tag using pop dots. adhere Holly to top of ornament overlapping the string. Add green and white chevron washi tape to bottom of tag.

page 4:
Sparkle 2 1/2" Tiny Flowers side b, add red glaze or red stickles to the entire work. 
Snwflke5 1 1/2" (x3) Countdown side b, ink around all edges in brown ink.
Adhere the word Sparkle to the right side of tag with the "p" overhanging the right edge.
Using red brads and pop dots adhere three snowflakes randomly to left side.

page 5:
Joy 3" Medallion side b paper, adhere green glitter to the letter "O", ink around all edges in green ink.
Snwflke 3" Snowflakes paper - on the 'swirly' part add red glaze or red stickles.
SnwflkLr 3" Snowflakes paper side b - ink around edges in brown ink.
Adhere JOY using pop dots to the top of tag.
Adhere the 'swirly' snowflake to the bottom with the edges hanging over.
Adhere the single snowflake over the other one using pop dots.
Add red dots washi tape to top of tag.


___________________________________________

Thank you to our amazing Designers for their amazing inspiration!!!  And to reward you for making it through this entire post....


Our friends at Provo Craft provided us with one Teresa Collins December 25th cartridge to give away on our Teresa Collins Design Team Blog. We will be pairing this with a set of our Christmas Cottage papers. Please leave a comment by 11:59 pm today by telling us what your favorite holiday tradition!

 Till next time happy crafting.


Wednesday, August 29, 2012

Chic and Scary...

Did you know that Chic and Scary is now available digitally from Cricut.com?


Make sure to get your copy today at cricut.com!

Wednesday, June 13, 2012

Sophisticated Cricut cartridge - Fluer De Lis project by Cheri Piles


I have had this frame for quite some time, just waiting for the right project to come along. I Love how it has a beautiful space in the middle that allows for dimensional items. 


To create this project I cut the Tan Damask paper (side B) from Fabrications to fit my opening then added the silver photo corners also from Fabrications to each corner.

I cut the Fluer De Lis using the "Sophisticated" cartridge in Cricut Craft Room & cut size: 4.5 x 8.1 from Sweet Afternoon "In The Attic" paper.

After I made my cut I used a ruller and drew very thin black lines creating shading on the fluer de lis. Once all of my lines were drawn I then went over the shading and around the edges using distress ink. I adhered it using Foam squares.

This is such a nice addition to my home office! I absolutely love the look and it was so easy to create!


Supplies:
Fabrications: Tan Damask paper (Side B) 12 x 12 paper, Trinkets
Sweet Afternoon: In The Attic 12 x 12 paper
Blingage: Jamie's and Stephanie's Gems
Cricut Craft Room, Cartridge: Sophisticated
Other: Frame, Therm O Web 3D Foam Squares, Micron Pen 01 (Black), Distress ink - Frayed Burlap, Ruler


don't forget there is a contest going on {HERE}


Join us in supporting Teresa on Ideal World in Europe. (the equivilant to QVC or HSN here in the US)
To make things more exciting Teresa is not only presenting Teresa Collins Designs she will presenting My Mind's Eye!!  
To watch her show click: http://www.idealworld.tv/WatchTvLive.aspx and click Create and Craft.

June 12 at 3:00 p.m (Mountain Standard Time) - Teresa Collins Designs
June 12 at 5:00 p.,m.(Mountain Standard Time) - Teresa Collins Designs
June 13 at 3:00 a.m. (Mountain Standard Time) - My Mind's Eye
June 13 at 8:00 a.m. (Mountain Standard Time) - My Mind's Eye
June 13 at 10:00 a.m.(Mountain Standard Time)- Teresa Collins Designs

As a great way to celebrate and support our love for all things Teresa Collins Designs and My Mind's Eye we will select a random winner to win a mixed collection prize pack from Teresa Collins Designs and My Mind's Eye. 

Enter to win by:
  • "Like" My Mind's Eye on Facebook at facebook.com/MyMindsEyeInc and let them know we sent you.
  • "Like" Teresa Collins Designs on Facebook at facebook.com/TCDesigns and  let us know what your favorite collection that was presented on Ideal World
  • Don't forget to leave us a comment on The Teresa Collins Designs blog to let us know that you are a fan of Teresa Collins Designs and MME! Click {HERE} for the post you should leave your comment on.
Deadline to enter is Wednesday, June 13  by midnight MST.
Good luck and share your love and support for Teresa on Ideal World!


Monday, April 16, 2012

Sweet Afternoon Layout by Suzanne Sergi


Hi, everyone! I am happy to share my first project on the Teresa Collins Design Team Blog. Today, I am sharing a scrapbook page of my daughter, using the new collection, Sweet Afternoon. When I first received this collection, it was love at first sight! The greys, pinks, blues, and hints of yellow work so well together. The colors are soothing, and are perfect for scrapbooking the special moments in your life.

I decided to use a photo of Macie in her Easter dress. She is my youngest, and I am thankful she still loves dresses. However, there is a story behind the dress. At first, she did not want to buy it. Even though my husband, and I insisted she looked absolutely adorable. She kept calling it the dress with all the wrinkles! Luckily, in the end all of our coaxing worked.

This photo complimented the pinks, and greys of the Sweet Afternoon Collection. Macie is my girly girl, so I wanted to add a bit more softness to the page. I added vellum butterflies, that I embossed with my Cuttlebug Folders. I added a larger scallop border at the top, also cut from vellum.

A list of supplies found on the project above:
Sweet Afternoon With A Book Paper
Sweet Afternoon At the Picnic Paper
Sweet Afternoon At the Park Paper
Sweet Afternoon Going Downtown Paper
Sweet Afternoon Decorative Brads
Sweet Afternoon Die-cut Accessory Sheet

Other:
Vellum
Ink
Cuttlebug
Teresa Collins Timeless Embossing Folders

One of my favorite techniques is stamping onto my pages. I was so excited to see the assorted stamps available. So many to choose from, and are very easy to use. I use the following stamps on my page: Sweet Afternoon Stamps, Everyday Moments Stamps, and the border stamp found on the Fabrications stamp set.
Here, you can see a hint of the large vellum butterfly. It was embossed using Teresa's Timeless Embossing folders for Cuttlebug. A simple detail that adds dimension, and texture to the butterfly embellishment.

Thank you for stopping by today, and I hope you have a wonderful day!


Thursday, March 1, 2012

Family Friends layout by Jamie Harder using Everyday Moments and Cricut Craft Room


I am so happy that Teresa Collins is designing cartridges for Cricut!  One of her latest releases for the Cricut Craft Room is the Teresa Collins Basics...you can check it out HERE.  I LOVE the fun patterns and couldn't wait to play.


I decided to use the Everyday Moments collection as I am really loving the yellow/blue combo lately.  Using my cricut, I cut out the large pattern and then added back in a few of the shapes around my page.  Then, since I couldn't stop using my Cricut, I used more of Teresa Collins designs to cut out "Family" and "Friends".  I love how much my girls are so much more than family...they really are sweet friends.

I can't wait to see how you use Teresa's Cricut images!!!


Monday, February 13, 2012

All Things VALENTINE by Colette Nederhoff


I am so excited to be posting today because I am just in time for my favorite Holiday!!  I have been busy making lots of Valentines and The NEW Fabrications: Linen line Teresa has designed is just awesome for this Day to celebrate LOVE!!!!  This collection has such elegant stickers and embellishments that convey the message perfectly!

One of the Things that makes this day so special to me is that I grew up a "Valentine"!   My maiden name is Valentine so my family definitely celebrated it every year and enjoyed having this day with the same name as ours!!!

I had fun with my Cricut machine and these wonderful Fabrications: Linen papers.   The cartridge I used to make the purse was the Cricut Imagine " Imagine more Cards".  I added a few embellishments and now I have a darling little gift box to hold candy or some jewelry!  The stickers and brads are all done up for you in this line!!
 Sending you a Hug from a REAL VALENTINE!!


Friday, February 10, 2012

those dreaded words... By Julie Jacob


Mom...I need a costume...........by Saturday."

And not just any costume.
Not a fireman. Not a nurse. Not an alien.
Oh no. It's a 'dress-the-part' murder mystery party...and my daughter needs a foreign medieval prince costume.
Seriously.

So I hit the thrift stores. Oddly enough there's no "foreign medieval prince" clothing section...so I had to scavenge the men's shirts. I lucked out and found one I thought would work.
Ouch. $4.99. Did they not get the thrift store prices memo? I find some brown pants that will work with my brown boots. Sweet.
Now for the vest. Every foreign medieval prince needs a flashy vest.
I decide to make one. After all, I had great success with a pirate vest at Halloween.
(Maybe not GREAT success...but it was passable.)
I go to the fabric store. Ouch again. $12.99 a yard for the flashy gold sparkly fabric that will make a dashing vest. Good thing I have a coupon.

At home, I whip out a vest to use as a template. I am optimistically planning for the whole vest process to take about 20 minutes.
(Feel free to laugh. A lot. Like grab your belly and really go for it.)
I cut it out and start sewing. You should know that I do NOT possess any sort of mad sewing skills. I am fairly proficient at straight lines...(and Barbie skirts) but that's about it.

It takes me all of 10 minutes to realize (AFTER the hemming was mostly done) that I've assembled the vest right-side in. The wrong side is showing.
I say bad words.
Then I decide it's not so bad after all, because the wrong side is the shinier side...and shouldn't princes be shiny? I keep going.

I then sew the armhole to the neck backwards.
I say more bad words.
I rip that out and sew it correctly.

The vest finally gets done. Mostly. 20 minutes of sewing is a blip in my rear view mirror that I have passed LONG ago. It is still inside out with the wrong side showing...but I'm trying really hard not to let it bug me.

Now I am worried it's more "My Big Fat Gypsy Wedding" than foreign medieval prince.
It needs something more.
Were you wondering when I would EVER get around to the scrapbooking portion of this blog post?
I fire up my Cricut machine and put in Teresa's Sophisticated cartridge.
I cut out a fleur de lis to use as a pattern. (Accent 3 - Border Shadow at 5").
My plan was to cut the fleur de lis out of the gold and use this really cool iron-on adhesive stuff to attach it to the shirt cuff (the gold wasn't showing up on the vest).
Sometimes though, plans go awry.
This is where my post title should change to "I Can't Read Directions so I Ironed the Fleur de Lis TO MY IRONING BOARD".
Don't believe me?
Note to self: put new ironing board cover on Target list.
I think that if I had just done the magic adhesive process on the actual shirt, everything would be ok. DO YOU SEE WHERE THIS IS GOING?

I repeat the process, ironing the gold fleur de lis to the $4.99 thrift store shirt.
Still wrong. So, SO wrong. Only now the above picture, complete with stuck on background gunk is now stuck to the shirt.
I am beyond bad words. I'm doing that weird laughing-crying sound. My daughter (who had joined me to try stuff on) is now looking at me like she can't decide whether to give me a hug or 'fetch Ma her medicin'.

This is where I took a little break.

I found a shirt that my husband had put in the donation pile. A white shirt.
Dang. Coulda saved myself $4.99. Except then I would have ruined that one, and not had a spare.
I decide the shirt looks fine as it is. I decide black fleur de lis' would look great all blinged up and stuck on the vest.
So I cut out another one, stick them on, bling them out...and...
hello medieval prince!
Today I'm working on her crown. I'm going to use the Sophisticated cartridge again.
There will be no sewing involved.
And hopefully no bad words or anything medicinally necessary.

Enjoy your Friday!! :)


Wednesday, January 11, 2012

Celebrating 2012 with Colette


I don't know about YOU- but I am always thrilled to start a NEW year!  Not sure if it's the RESOLUTIONS, or a fresh page on the calendar- or maybe cleaning up the clutter from the busy holidays, BUT I love a brand new YEAR!  It always energizes me!!
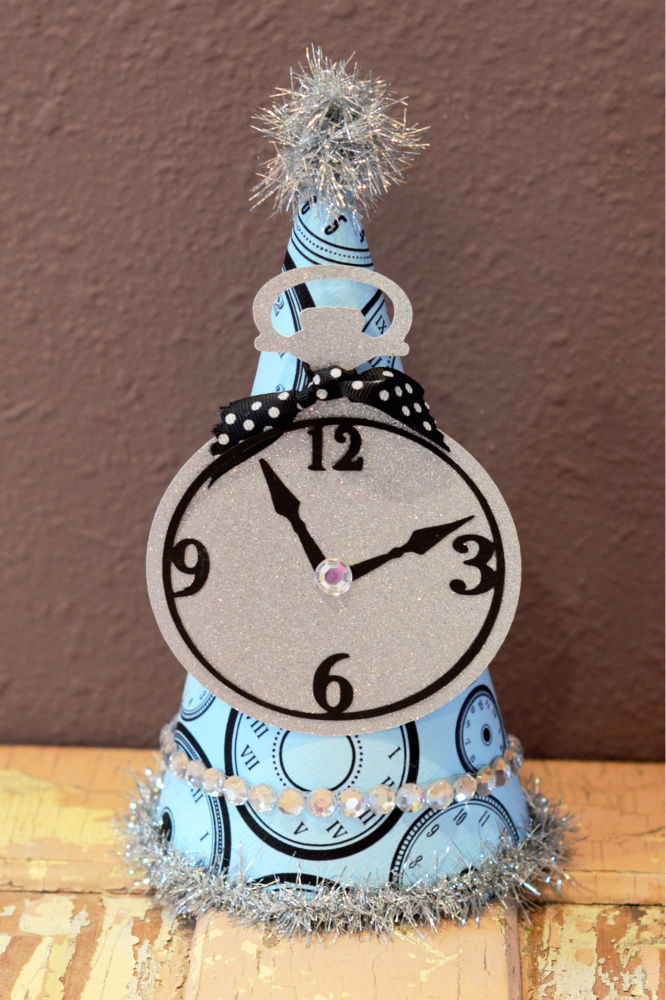
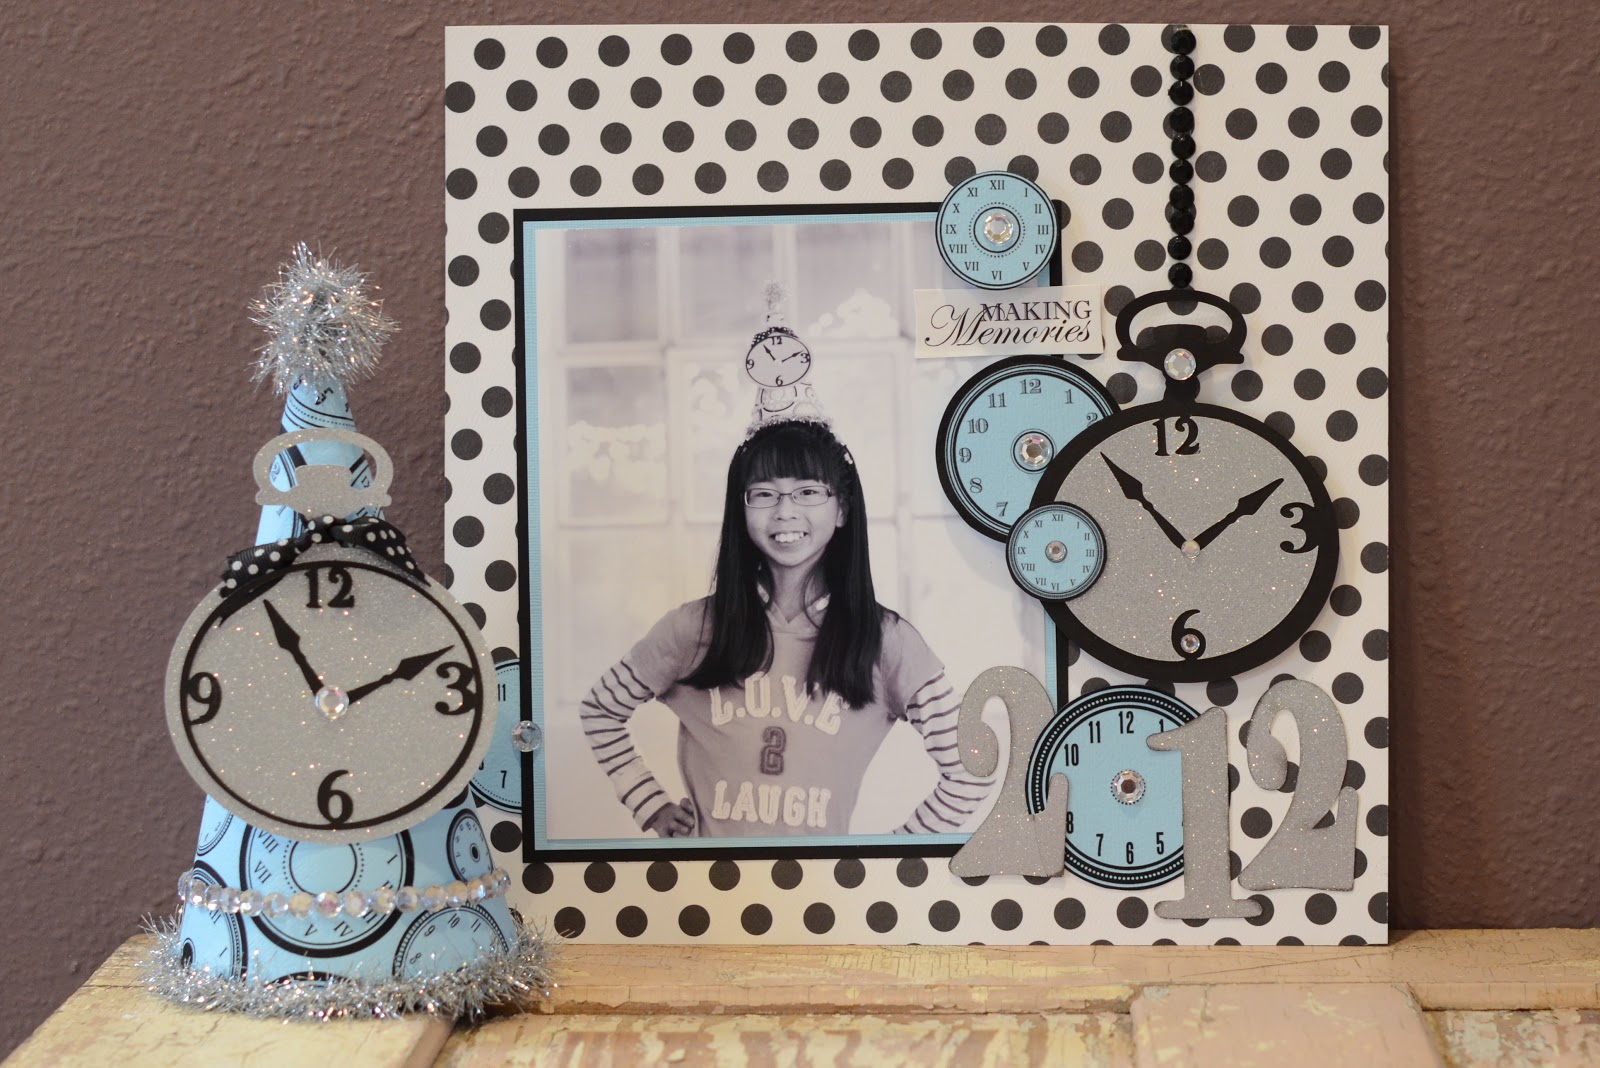
The Teresa Collins  "Sophisticated" cartridge has gotten  alot of use at my house, along with the "Black and White" cartridge I use on my Cricut Imagine!  I have had this CLOCK spotted on the cartridge and knew I would be using it in Honor of the NEW Year.   I had fun making my daughter Jensen a New Years Eve party hat with the 2 cartidges.

I first used the Teresa Collins "Black and White" cart to print out the awesome clocks on the Blue Bazzill cardstock.  I made a cone- shaped party hat and glued it together in the back with Hot glue.  Next I used
"Sophisticated" to cut out the BIG clock with Silver Glitter paper in the Teresa Collins "Haunted Hallows" line.  This clock measures 5 inches tall.  The numbers  were cut from black cardstock and this cartridge makes this super easy to make.

I added some ribbon to the top of the clock and also a strip of Donna's Gems at the bottom edge. (Saved one gem for the middle of the clock.).  I added some tinsel trim and it is a darling hat!
Here's the layout I made with Jensen wearing the Hat on New Year's eve. I was happy to get this photo to a pretty good black and white- since the party had very dim lighting-- but it shows how cute it turned out.


This layout was made with more "Haunted Hallows" glitter paper and black cardstock for the clock.
The blue clocks were leftovers from making my hat so I used them to add dimension and color to the layout.

MY paper base for the layout is Teresa Collins "Carolina Breeze" Gentry paper.  The sticker "making memories" came from this line also.

I also loved using the glitter paper to cut the numbers.  Another wonderful thing included in the cartridge-- numbers and an alphabet so there are lots of variety of components to use.

I wish everyone a fantastic and FRESH new year-- and many blessings in 2012!!

Thursday, December 22, 2011

Happy Birthday! Tag by Julie!!


Yep. I know it's December 22. And I'm sure most of you are up to your eyeballs in Christmas preparations and cheer. ;) That's a good thing. We just happen to be celebrating a couple of birthdays here too. Honestly, sometimes it's hard to stop the Christmas mind-set and jump into birthday. I have a special place in my heart for all of you with Christmas-time birthdays. :)

Today is my husband's birthday, and my daughter turns 12 the day after Christmas.

Isabelle is very much smack in the middle of a zebra phase right now. I cut a big (as in ginormous) tag out of Posh Black Lace paper, and then Mod Podged it with zebra print tissue paper. When you look at it close up, the lace pattern shows through.

I wrapped some black tulle around the bottom, and then added her monogram. (She asked me to use a B for Belle instead of an I.) The 'B' is a chipboard letter (Colobok) that I covered with Posh Butterfly Script paper. Then I added a coat of Iridescent Medium (Winsor & Newton) to make it a little sparkly/shiny.

For the crown I used Posh pink glitter paper. I cut it out at 4" with Teresa's Sophisticated cartridge (crown1). Adhere to tag and add bling (Stephanie's Gems & Jesse's Jewels).

For the hanging bling at the bottom, I deconstructed a black T Drop that I was tickled to find at the back of my drawer. :) Don't you love it when you find stuff like that? I took off 5 little blingies, poked holes, and hung them from the bottom of the tag.

Print a happy birthday message on white cardstock (I used the Porcelain font and added the Iridescent Medium to this too) and add to the top of the tag with 3D foam squares (Thermoweb). Finish with a black lace hanger.

Happy Birthday Belle! And Happy Birthday to my husband today. :)

And from me and my family, a very Merry Christmas to you all! Have a wonderful and blessed holiday season.

Friday, December 9, 2011

Happy 4 YOU tag by: Colette Nederhoff


I am really a fan of tea stained paper - and the "OLD" look it gives the project.  I wanted an antique look for this tag.  Here's what I used to make it:

Tea-stained tag:  7 gypsies
World Traveler papers: Red Brocade and Black Damask
World Traveler Trims and Decorative Brads
Cricut Expressions Machine
Teresa Collins Sophisticated cartridge
Blingage Stamp Set
Timeless Stamp Set
Blingage:  Jason's metal stars
Jute
Mocha Chalk Ink: Quick Quotes
Foam Pop Up dots:  Close to my Heart
2" scallop circle punch: Fiskars


To create this tag:  
First you want to cut your red shapes using the Cricut and the Sophisticated cartridge.  
The bottom red shape measure 4 1/4"  wide and 2 1/2" high.  The brocade red is slightly smaller to layer over the solid red one. Adhere them together and also add the brads to hold them together. Distress edges with Mocha ink. 
Next I stamped the border with the "Timeless" stamps along the bottom of my tea stained tag.  This large tag measures 6 1/2" tall.  The Red shapes can be added to the tag by popping with foam dots.
Punch a scallop circle and distress edges.  You can stamp any message on this circle.  I used the Blingage alphabet for stamping mine.
I also used a 2nd tea-stained tag to stamp "happy" and cut that out.  
Tie a piece of the World traveler lace trim above your red shapes.  I knotted to the right side and glued the Happy on top of my knot.  
Tie a Metal star on the tag with some Jute and it is ready to tie on a package!! 


Related Posts Plugin for WordPress, Blogger...