
We are so excited for you to get to know team member Colette Nederhoff!! We asked Colette a few questions and here is what she had to say:
 |
| Colette Nederhoff |
What is your scrapbooking style? I'd say it is "detail oriented". I do fill my pages with alot of details and do not like the "ordinary -- what you would expect" on a page. I try to think out of the box.
How did you start scrapbooking? I started when I was a consultant for Close to my Heart and the company brought in scrapping.
What influences your designs? I look at lots of magazines and websites and try to "LIFT" the idea - but make it my own. I wish I could say I was an "original thinker".
How long do you spend working on a layout? I think I am pretty slow at scrapping so it can vary from 30 minutes to and hour.
What does your work area look like when you are working on a project? I am a MESS!
What is your favorite color combination? I love Black and White- which is why alot of Teresa's designs are so good at my house. I also love Turquoise alot
Do you have any other hobbies? I have tooo many to name. I have been a crafting teacher at a craft store in my past, and a tole painter, so you name it, I have probably tried it. I make Jewelry, I sew and I am learning a lot about photography every day. I think "ARTSY" should have been my middle name.
________________________________________________________________
Check out these amazing layouts created by Colette using the Sports Edition II collection


“123 SHOOT” layout
Designed by: Colette Nederhoff
Supplies:
3- 4X6 photos all vertical
1- Teresa Collins Designs “Blue Numbers” papers
1- Teresa Collins Designs “Sheilds” papers
1- Teresa Collins Designs “Die Cuts” paper
1- Teresa Collins Designs “Tags” paper
1- Teresa Collins Designs “Circle Tags” paper
Blingage: Shelley’s stars
Black chipboard letters and numbers - Cosmo Cricket blackboard
Black Coredinations Cardstock
White TAG -- Office Max
Blue Safety Pin-- Dritz
Black Chalk INK
Adhesives: Glue runner and foam squares
Instructions:
Preparing your Page components:
1. Cut the following pieces from your papers:
* 6”X 12” piece of Blue numbers paper
* 7” X 4 ¼ inch Black Coredinations cardstock
* 3 ¼ “ X 3 ¾:” Blue numbers paper
* 4”X 6 ¾” Sheilds paper - use ledger side
* 3 ¼ “ X 6” Black Coredinations cardstock
* Black pocket from “Die Cuts” paper
* 2 white Circle tags from “Circle Tags” paper --the calendar and GAME
* 2 black cardstock circles slightly larger than the calendar and GAME circles to “mat” them
* Play Hard Tag from “Tags” paper
* numbers strip from “Die Cuts” paper
2. Distress the edges of the white papers with the black ink.
3. Trim your photos: The 2 outer ones measure 3.5” X 5.5” and the center one measures 3” X
5.5”. Mat the center skinnier one on Black cardstock. Adhere the white ledger paper to the
larger black mat and add a strip of numbers to the top portion. Place the center photo right
below that leaving a small white border under the photo. Set this component aside after
assembly.
4. Glue the 6” X 12” inch strip horizontally across the bottom part of the 12X12 Blue numbers
paper. I left 2 rows of the numbers showing. Then adhere your 2 outer photos leaving a small
blue border. Attatch the center photo component up higher in the center creating a stag-
gered effect. The center photo is 1 ¾” from the bottom of the blue strip, leaving that portion
of the blue open for the letters. To pop this component, Use foam squares.
5. The left edge of the Play hard tag gets cut off to make the card measure 3” X 3.5”. Use the
Blue background smaller piece you cut earlier to mat the Play hard. Glue in place about ¾ “
above the left hand photo.
6. Create a pocket by folding the Black Practice pocket from the “Die Cuts” paper. Glue a little
strip of numbers about 1 ¼” down from top. Use a pin to hang the “Shelley’s star” and also
tie the string from our white tag to the pin. Pin the whole thing on to the pocket. Your
journaling can be written on the white tag and stuck inside. The tied string will keep it from
getting LOST!
7. Lastly, Adhere your chipboard numbers and letters in place. Use Foam squares to add the
“O’s” and journal the date on the calendar.
____________________________________________________________


By: Colette Nederhoff
Featuring: Teresa Collins Designs Sports Edition II
Supplies:
2- 4X6 photos
All Papers are Teresa Collins Designs Sports Edition II
1- Practice paper
1- Shields paper
1- Blue numbers paper
1- Die Cuts paper
1-Circle Tags paper
Blingage: Jason’s Metal Stars
Sports Edition II Decorative Brads
Red Baker’s twine
Adtech glue runner and Thermoweb foam squares
Fiskars circle cutter
Instructions:
Preparing your Papers:
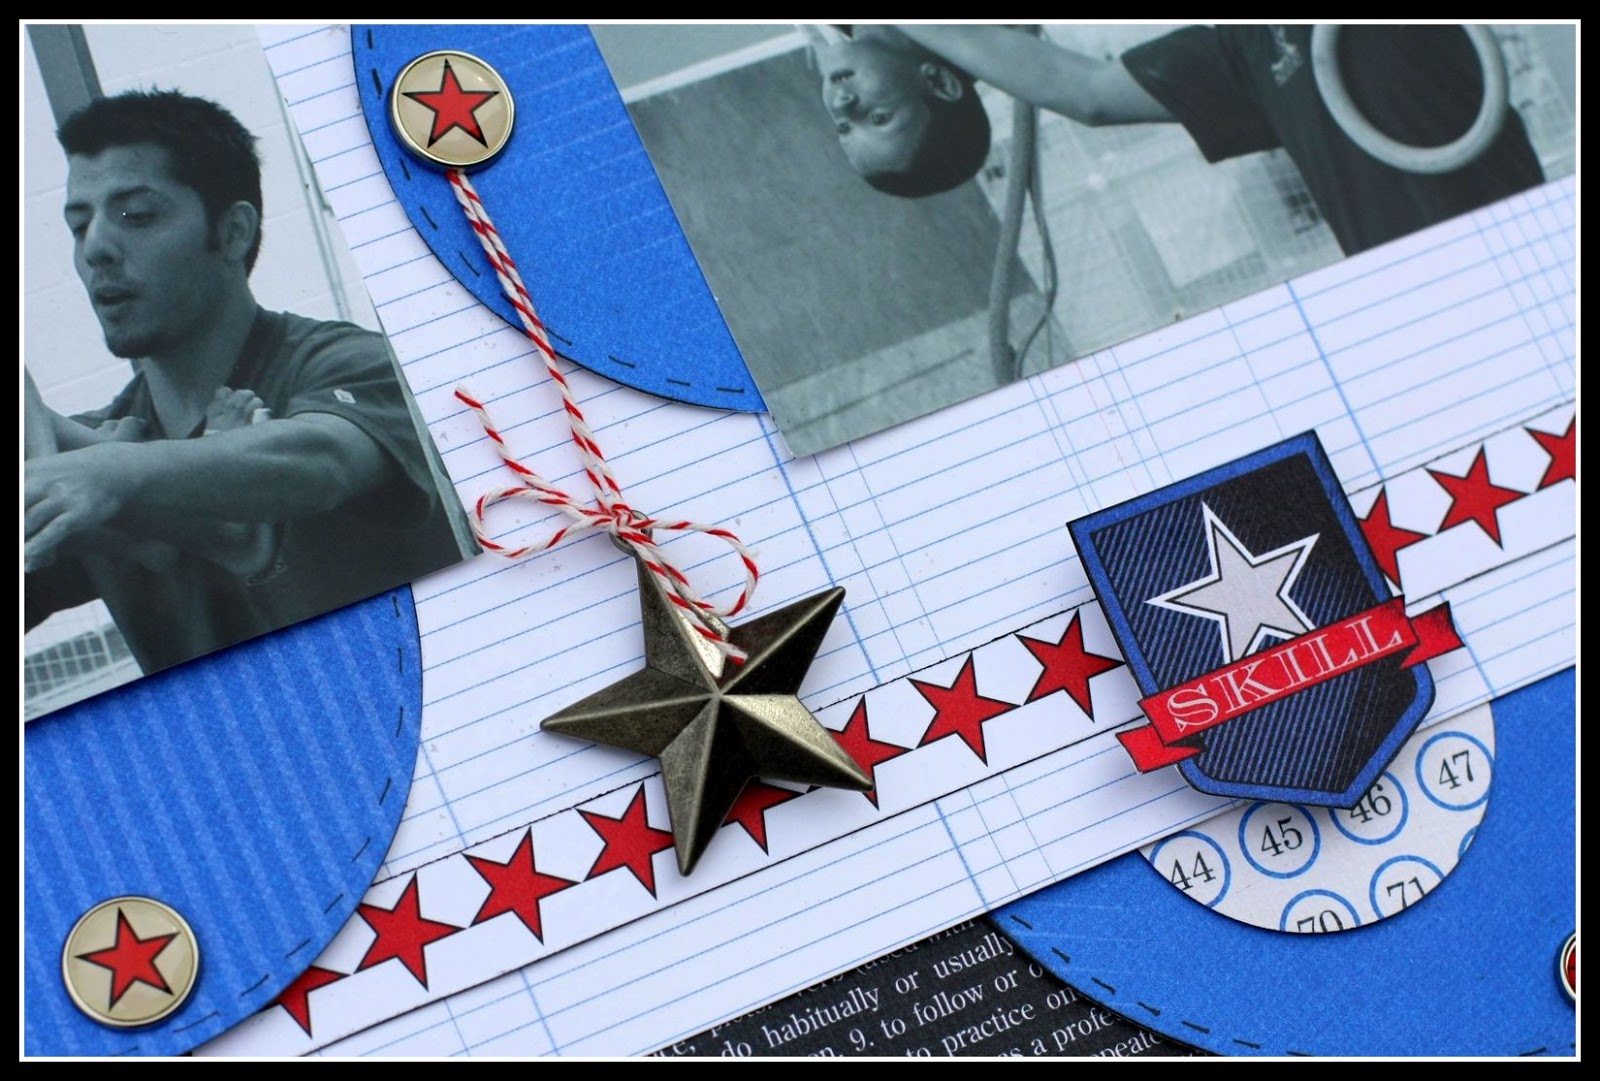
1. 1- 6 ¾ “ X 12” strip of the Back of the Sheilds paper
1- 6” circle Blue numbers
2- 3 ½ “ circles Blue numbers
1- 2” circle Blue numbers
1-strip of red stars from Sports Edition II Die cuts
1- Do what you Do best shape from Circle Tags paper
1- Skill Sheild from Sheilds paper
Assembly:
1. Start by gluing a strip of red stars on the ledger paper about 1 inch from bottom.
Then cut the 6 inch circle and the 3 ½ inch circle in half. Take 1 of each size halves and make a rainbow--. (best way to describe this!)
Glue down the strip of Ledger paper horizontally to the 12X 12 Practice background with the
Rainbow Situated between the words Practice> Glue all of it down along that top edge, but
leave the bottom edge of the ledger unglued, so you can tuck another half circle at bottom.
You will also glue a half of a 2” circle with that on the bottom right . I added a Brad into the bottom of the large circle . These circles and the horizontal ledger paper should
all be glued and secured down before moving on.
2. Crop 1 of the photos to 4 ¼” X 4” and place to the far left side around ½ “ down from
top of ledger paper. Before gluing down, cut one of the 3 ½ inch circles in half
and place under the bottom of photo. Place a brad in the bottom before completely
securing both photo and circle.
4. Place a brad in the bottom of another ½ circle of the 3 ½ “ size. I glued this one to the left
side of the 4” X 6” photo and this photo goes all the way to the right edge of the layout.
The blue side of the 2 inch circle half goes up in the top right side of the photo and ledger
sheet..
5. To finish, take a 8 inch piece of red baker’s twine and hang it over the brad in the center of the
Page. Tie on a Jason’s Metal star and tie a bow at the top of the star to attatch.
6. Lastly, I used foam squares to POP the 2 cutouts. Place one on the top left side and one in
the bottom right.
Thank you Colette for your great layouts. To see more of her layouts and designs click {HERE}
I adore how you used those circle tags as the oo in shoot! Awesome!
ReplyDeleteDitto on what Stacey said...love seeing your LO...and getting to know all the girls a little better.
ReplyDeleteColette - Great job on the layouts, love the circles on the upside down layout. I agree, it's fun to get to know everyone better.
ReplyDeleteGreat pages, Colette! Love the little swinging star :)
ReplyDeleteLove it! And I LOVE Colette! She's not only a dear friend, but has taught me so much over the past 12 years. When I met Colette I was a baby scrapbooker, and had never used a rubber stamp. Because of her, her inspiring personality and style I am a die hard paper crafter to this day.
ReplyDeleteI've always thought of myself as a Colette wantabe.
Buffie
http://scrappingwithbuffie.blogspot.com/
Great pages Colette! I have a weakness for circles. Loved the way you incorporated them with your layout. WAY TO GO!
ReplyDelete