Showing posts with label Vintage Finds. Show all posts

Tuesday, February 19, 2013

Project Life - with Julie


When I heard we were doing a Project Life feature on the blog, I was so excited. :)
I am LOVING this project.  I tried it a few years ago...and made it through May.  And I'm STILL sad I didn't finish.  This time around has a different feel to it.  I am more organized.  I am excited to work on it every week.  I have a support group, lol.  

Today I am sharing my week 7 of Project Life...(last week).  
As it was Valentine's Day that week, I did a red/hearty theme.


I used Stationery Noted, Vintage Finds (for the key 3x4 card)...and a mixture of lots of other things.
Here's a close up of the left side:


The bigger picture is 6x8.  I Photoshopped the 'Love this girl' onto the photo.
And my mom needed a special spot in this week:


My mom is almost 87.  And last week one of my blog friends happened across a PBS video on hipsters, of all things.  AND THERE WAS MY MOM!  Right in the hipster video.
She got quite a kick out of it when I showed her.  (Although she had no clue what a hipster was).  

Here's the right side:


This page was one 4x6 slot, and the rest 3x4.  I like using all kinds of stuff in my Project Life pages.  There's a vintage Valentine...a playing card (Ace of hearts, of course)...and the bottom right spot is sewn shut with confetti in it.  (Kind of like my card from last week.)


I also did a little insert page (lots of pictures last week!)  You can see that on my blog, if you'd like. 
Thanks for letting me share.  Don't forget to comment every day this week for a shot at that fabulous prize pack! ;)


Monday, January 7, 2013

"Remember" Vintage Finds Mini Album by Stacy Rodriguez


Hello everyone and happy Monday!  Stacy Rodriguez here with you today sharing a project that I created with Vintage Finds.  This has to be one of my all time favorites lines.  The colors and design of this line make it super easy and fun for me to create with. 

I tried something new with this album and created a hinge binding with a chipboard spine and covers.  Once I have it perfected I will share with you how to create one!  So onto my project, up first are a couple of pics of the cover and a side view.


I added ribbon to the inside of both the front and back covers to tie the album closed.


I love a thick bulky album and this one does the trick for me. With this hinge binding it allows room for extra bulk :)


Now for all the goodness inside. I used everything from the Vintage Finds line...I don't think there was a thing I didn't use really! The pages are made using black cardstock...super easy and you can make any size album that you want!


This album is full of photo mats, along with hinge pages that insert into each other at the top of the page or on the side of the page through out the entire album. These hinge pages slide completely out of the album creating space for 4 extra photos on the front and back.

The right side of this page below even has two pockets on the front of the page.


A fun little top load insert with a half pocket going on below. When you flip this page up there are two pockets on the front of the page under the flap.

Thanks so much for stopping by the blog today, hope you have enjoyed my Vintage Finds mini album! Stacy 

Friday, January 4, 2013

Journaling Cards by Julie


I have decided to do Project Life this year...and I'm so excited about it.
I just hope I can STAY excited all year. :)  Have any of you done it before...for the whole year?  Any tips or tricks you'd like to share?  I want to stay motivated!

This is my cover page:

I did it in Photoshop...printed it off, and then stitched the little heart.
The back:

And then the other intro page:


Don't get me wrong.  I love telling stories with photos...but I am ADDICTED to those little 3x4 journaling cards in the middle row.  Even if you're not doing Project Life...there's so many ways to use them on your pages, or in mini books.  (And yes, that's Wonder Woman.  LOVE her.)


I did 'the jacob family' and 'twenty thirteen' stamps with my TC Stampmaker. :)

Here are some more 3x4 cards I made with Vintage Finds and Now & Then:


Not kidding...just the easiest thing ever to make these little guys.  Each one is a 3x4 piece of patterned paper.  I used Vintage Finds papers.  (I love the Bingo card paper...each one is 3x4).  Then I rounded the corners and dooded them up a little.  Since they're so small, you just need a little bit here and there.  I used washi tape, stickers, border strips...a key from my desk drawer (really hoping it's not to anything important!)


On the key card...the 'I love you' is cut from the patterned paper of phrases (Vintage Finds).  I typed the 'you hold the key to my heart' on my old typewriter.  And the heart is punched from washi tape.
On the Here's the Story card...I used a doily and office clip.  The heart is punched from a coffee sleeve.


I left room for journaling on some of them...


You could do a whole set with just the Bingo cards. :)
Wish me luck with Project Life.  I tried in 2009...and made it almost 6 months.  And I'm SO sorry I didn't finish it...it's one of my favorite albums to look through.

Happy New Year to you... :)


Wednesday, January 2, 2013

Trying something new with Cheri Piles

Happy New Years everyone!!

I have thought a lot about this project, I have envisioned it for months now. I just didn't really know what to do or how to start.... My own "self-talk" & fear of failure kept me from doing this sooner. I woke up the other day and said enough. I can and will do this, I want to try so badly, so I did it - I took a leap of faith. 

I have to say a HUGE HUGE, THANK YOU to Sesil, I happened to call her as I was in route to buy my supplies and she was a huge help! So Thanks Sesil!!!

This was my first collage art piece. I used all 9 papers from the Now & Then collection. Can you find them? Each piece of paper is represented in one form or another. It's very whimsical and fun!
I love this quote from the die cut banners, I just cut the words out and adhered them.

This is my second piece - you can see I'm starting to get the hang of it, it's not perfect by any means but I LOVE this one the most! It is so inspirational!

Another quote, and it's so true!! I am going to frame this and put it on my desk... I have big plans for this year!!!

This is my third piece, it is using the Vintage Finds Collection. I really wanted you to see this in the frame. It MAKES ALL THE DIFFERENCE in the world to frame these! Wouldn't you agree??

I can never get enough of these flowers layered on one another, I cut them out from the "flowers" paper. I did not glue them "into" the project, I wanted to see what it would look like as a 3-D effect.

What I learned:
  • Never not try something new no matter how much it might intimidate you - give yourself a chance to grow. You can see that just after a few tries I am starting to get the hang of the very basics of collage art.
  • Go with the flow and use papers that YOU love and that inspire YOU! When you are inspired, your art will reflect it.
  • Different mediums may change or alter the hue's of the paper. Project #2 really is bright in real life!!
  • Gesso allows you to have a Do-over, lol!!


What I used besides papers from the Now & Then, Tell Your Story and Vintage Finds Collections:
  • 8x10 Canvas 
  • Gesso - Acrylic, Opaque, Matte, Medium fluid (from the back of the bottle) - I painted this on top of the canvas to give the paint something to stick to.
  • Slow Dry blending gel medium - I mixed this with my paint on project #1 & #2. I also used it as a "mod-podge" to apply the layers and over them.
  • black pen - I like the look of outlining some of the pieces of paper.

 I hope this inspires you to try something fun and new!

Tuesday, December 25, 2012

A week in the life...and Merry Christmas from julie :)


Wishing you and your family a very Merry Christmas today! :)
I know you're probably hip deep in gifts and crumpled up wrapping paper.  Maybe your'e sacked out on the couch in the throes of a food coma...that's all good!

I want to quick share my A Week in the Life pages with you.  I did the week of Thanksgiving.
I used divided 8.5x11 page protectors.  The top part is about 4.5x8...and the bottom holds two 4x6's.

I just wrote about some things that happened each day (big or small)...like my ice cube maker working again...yay!  
Monday:
I used LOTS of different Teresa Collins lines in my week.  How many lines can you find? :)  (And duck tape...that's always good.)  
Tuesday:

Wednesday:

Thursday:
Thursday was Thanksgiving. :)  

Friday:
Black Friday!  (We opened up several Black Friday goodies this morning.)

Saturday:

There you have it.  My week. :)  I really enjoyed breaking down each day into three little sections.  
Have a wonderful Christmas Day!


Friday, November 30, 2012

Now featuring.......


Hello again...it's almost December!  
Are you getting ready for Christmas?  Is your tree up?  Have you started your shopping?
(Can you tell I am excited for Christmas... just a little bit?)
Our oldest will be home from college in 12 days!!  woohoo!  I think I am the most excited for that. :)

Oh my goodness, there were SO many amazing projects submitted!  Thank you, thank you.
We TRULY love to see them.  
I want to introduce Kelly Foster, this month's Featured Fan.  :)

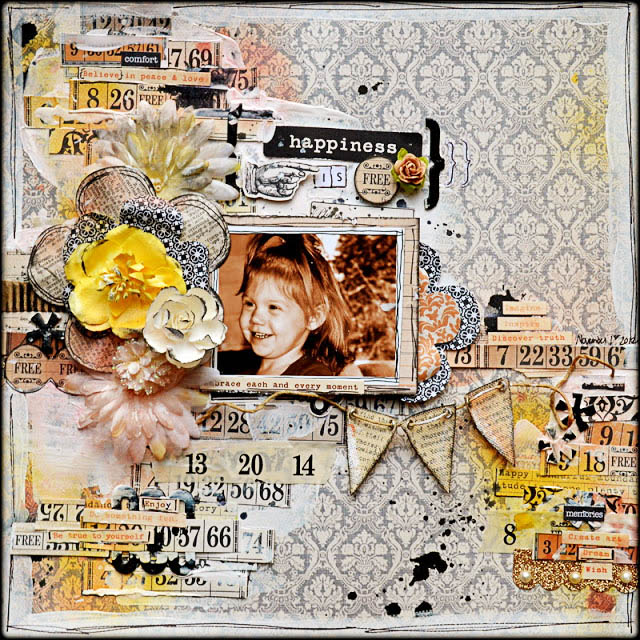
Hi! My name is Kelly, I am 26 years old and am living my life in the beautiful state of Minnesota (USA). I have two daughters, aged 2 and 7 months, who keep me super busy but in between bottles, diapers, dishes, playing dolls, calming tantrums, and stepping on toys, I sneak in a little crafty time! I began scrapbooking just over two years ago. I would describe my style as artsy/shabby, with a little bit of everything. What I create totally depends on the mood of the day!! I especially enjoy dramatic colors, and lots of flowers. I have really gotten into the mixed media side of the hobby lately, and love making a big mess and seeing what comes of it!! Thank you so much for featuring me here today, I really really really love creating with Teresa Collins products, so versatile and fun!!


Stunning!  I love the layers...the ink...the glitter...all of it. :)


Tons of detail....


Yes, the page is AMAZING...but look at that sweet little face!  I am such a sucker for ginger hair.  She is beautiful, Kelly.


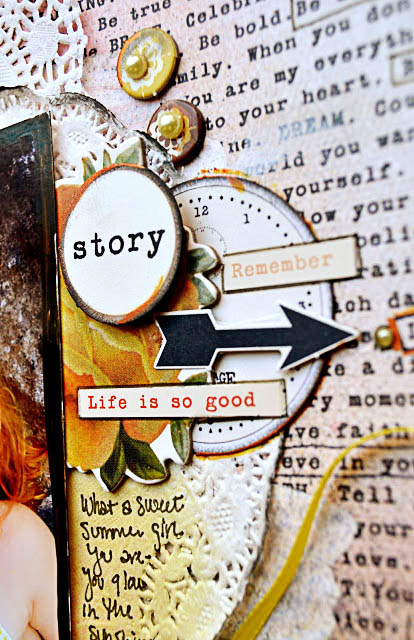
And this...


Don't you just love Vintage Finds? :)


Kelly also does fun home decor stuff like this:


Check out this post on her blog for how she totally transformed this tree!
The before and after is pretty cool...

Thank you so much Kelly, for sharing with us!
And look for another Featured Fan link post on Sunday for next month...


Monday, October 29, 2012

Vintage Finds - perfect for weddings!


Hi TC fans! I've been scrapping up a storm with the Vintage Finds collection and, I have to say, my wedding pictures keep finding their way onto these layouts! This collection is by no means a wedding collection, but the neutral, classic tones and patterns make it a perfect line for highlighting these precious photos :)


I chose lots of creamy coloured papers and embellishments with some pops of black for this layout. I kept the focus on the 5"x7" photo with a simple cluster of die-cuts, chipboard, buttons and pearls beneath it.


The flowers above and below the picture were cut from patterned paper. Because of the pale colours I inked the edges of everything to add some definition and contrast.

I can see I'm going to need a lot more of this line if I'm going to scrap all 350 wedding pictures... ;)


Amanda's blog
Related Posts Plugin for WordPress, Blogger...