Showing posts with label Colette Nederhoff. Show all posts

Monday, March 26, 2012

These things Make me Happy!!! Layout by Colette using Fabrications


Spring Colors just really make me HAPPY!!  I am all about Color which makes using the Fabrications: Canvas line alot of fun!  The Yellow seems to go with Everything- and I am using it alot these days.


 We have a little friend who is full of spunk and personality- and I had taken this photo of her a couple years ago!  This kid truly makes me smile!  I love how all the colors of the Papers truly pop!

I added a touch of texture to my layout by using some awesome yarn I found at Hobby Lobby.   I think the Yarn industry is getting all kinds of cool textures and since this one went so well with the papers, I used in to accent the photo.  I cut my Turquoise paper piece first and started by stapling the end of the yarn  to the back of the paper.  Then I wrapped it around several times - which leaves all the little " tails" in different places.  I stapled them down in different spots to hold it in place.  My turquoise paper piece is lifted with Foam squares.  The BIG button is also from Hobby Lobby and tied on with 2 of the tails.

The REST of this layout was very simple because of the wonderful Die Cuts and stickers in the Fabrications: Canvas Line.  I added some journaling and some detail lines with my Black Zig pen and my fun layout was quick and easy.

Check out the Entire Line of Fabrications: Canvas!  You will want all the elements to make your Spring scrapping full of Fun Color!

Monday, March 12, 2012

Playing with Cricut Craft Room project by Colette


Hey- have you been playing in the Cricut craft room?   I hope so-- I sure have!  It is an amazing online studio and I have been cutting so many things with the Cricut MINI!  I am just loving this EASY process -- you can cut out anything!!!
So the deal is ...  I was making some tags with Teresa's Spring Fling line ...

 Lickety-split, you can cut several with just a quick few clicks in the Craft room studio-- sizing them to what you want - and then hitting the CUT button!  The MINI is just awesome!
It was fast and amazing- 12 little adorable tags for a project I was making!!  Turned out great!!
After peeling up all the tags and using them-- I had a Wonderful Left-over!  Here's how I used it!!


The left-overs got transformed into a background for my layout!   I love how I got to decorate all the tags in a different way - using the great elements in Spring Fling's line.  Some of these spaces, I used the tag I had cut out and just turned it over and the coordinating paper looks amazing!  I made these dimensional with Pop Dots.  This Spring Fling Line has cute buttons and butterflies, also!  Some extra added Felt pieces, and lace trim give each tag it's own personality!!  
Just a word of encouragement-- don't throw away the left-overs-- sometimes they can be transformed  into cuteness !!!

Head on over to the Cricut Craft Room and see all the cuteness YOU can create!

Monday, February 27, 2012

Fabrications: Linen Blocks Frame by Colette Nederhoff


My project today is a gift for a friend!  Her daughter recently got married and I had run across this cute photo of them I had taken at the wedding, so I decided to get creative with Teresa's new Fabrications: Linen line.    This frame measures 13 X 13" and has a 12X 12 opening, perfect for a scrapbook page!

Supplies:
Fabrications Linen papers: Red Quatrefoil, Green Brocade (black side), Red Flowers (red side), Green Fleur de Lis (black side), Ornate Brackets and Die Cuts
Fabrications Linen: stickers
Fabrications Linen: decorative brads 
White cardstock: Office Max
Black Cardstock: Hobby Lobby
Fabrications Canvas "trinkets"
Teresa Collins Blingage:  Carol's clocks, Amy's gems, Donna's gems
Black Ribbon: Hobby Lobby
Black chalk Ink:  Quick Quotes
Adhesives: Bazzill Marathon runner, 3D dots by Close to My Heart, and Glossy Accents by Ranger

Here's how I made this piece:
1.  The base is a 12x12 sheet of Fabrications Linen
2.  Cut a 9 1/4" square of black cardstock and a 9" square of white cardstock.  Place the white on top of the black to mat it.
3.  The inner squares can be YOUR choice of papers.
The squares are cut to 2 1/2" squares.  I used 5 patterned paper ones and 2 black.  One of the black ones is the mat behind my photo. I distressed all the squares with black chalk ink.
4.  To make my red layered flower, I cut 4 graduated sizes of circles (free hand) and the largest one is 2 1/2" in diameter.  After cutting, I bend the edges in and chalked them with black ink to add distressing.
Stack them and the center is a brad that holds them together. 
5.  The last circle is a die cut from the die cut sheet that I added a blingage jewel to. 
6.  For embellishing  one of the red  squares, I used black cardstock to free hand cut a heart.  It is glued to the left side  and then  add a flourish die cut with 3D dots. 
7. For the clock, I punched 2 small holes toward the top center and tied a black ribbon thru it to tie the clock to.  
8.  The Trinkets accent one of my squares on opposite corners. 
9. I used a row of black gems to accent one of the patterned squares. 
10.  To assemble- I started by placing the 4 corner squares first and then spacing the rest of the pieces equal distances apart.  I popped 3 of the squares up with 3D dots to create different levels and dimension
11.  Add stickers and die cuts to YOUR liking!
Place in the frame and YOU have a lovely home decor item!!! 

This was a very fun and quick project and it will be a cherished gift!!

Monday, February 13, 2012

All Things VALENTINE by Colette Nederhoff


I am so excited to be posting today because I am just in time for my favorite Holiday!!  I have been busy making lots of Valentines and The NEW Fabrications: Linen line Teresa has designed is just awesome for this Day to celebrate LOVE!!!!  This collection has such elegant stickers and embellishments that convey the message perfectly!

One of the Things that makes this day so special to me is that I grew up a "Valentine"!   My maiden name is Valentine so my family definitely celebrated it every year and enjoyed having this day with the same name as ours!!!

I had fun with my Cricut machine and these wonderful Fabrications: Linen papers.   The cartridge I used to make the purse was the Cricut Imagine " Imagine more Cards".  I added a few embellishments and now I have a darling little gift box to hold candy or some jewelry!  The stickers and brads are all done up for you in this line!!
 Sending you a Hug from a REAL VALENTINE!!


Monday, January 30, 2012

2 page layout with Carolina Breeze "Vintage Style" by Colette


Today I want to share a layout I made with "Carolina Breeze".  I think the papers in this line are very versatile and they worked so well with these photos I took of my daughter.  We have a collection of Vintage cameras at my house- and this particular one- I actually spray-painted BLUE!  This camera was not in the BEST condition when I bought it at a second hand store - so with a little coat of paint and some damask stickers-- it is all "Fixed up".  

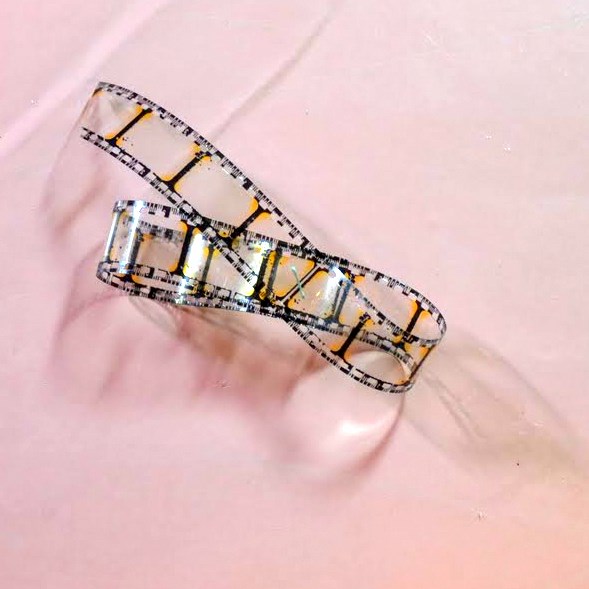
Along with the Carolina Breeze papers -- I also used the alphabet stickers from the "Notations Album" - another of Teresa's lines.  Since the story was about the camera -- I made a flower with Tim Holtz "film strip ribbon".  Here's how I made the flower:

I cut  4 strips of the film -which is made of acetate.  The strips measured about 8 inches long.  I folded them over to create loops and stapled them in the center.  After doing this to all 4 strips,  I piled them on top of each other to create a flower.  The center of the flower is held together with a Bling BRAD. 
I used the film strip to make the stem of the flower and also as borders to my photo.  
Have a delightful day making memories!


Wednesday, January 25, 2012

Amazingly beautiful!! Everyday Moments Birdcage by Colette


I am a HUGE fan of Birds and Birdcages!!  It's a popular trend in decorating, and when I saw the New line "Everyday Moments" by Teresa Collins-- I knew I had to come up with a decorative Birdcage for my home.  I knew this paper line would be PERFECT!

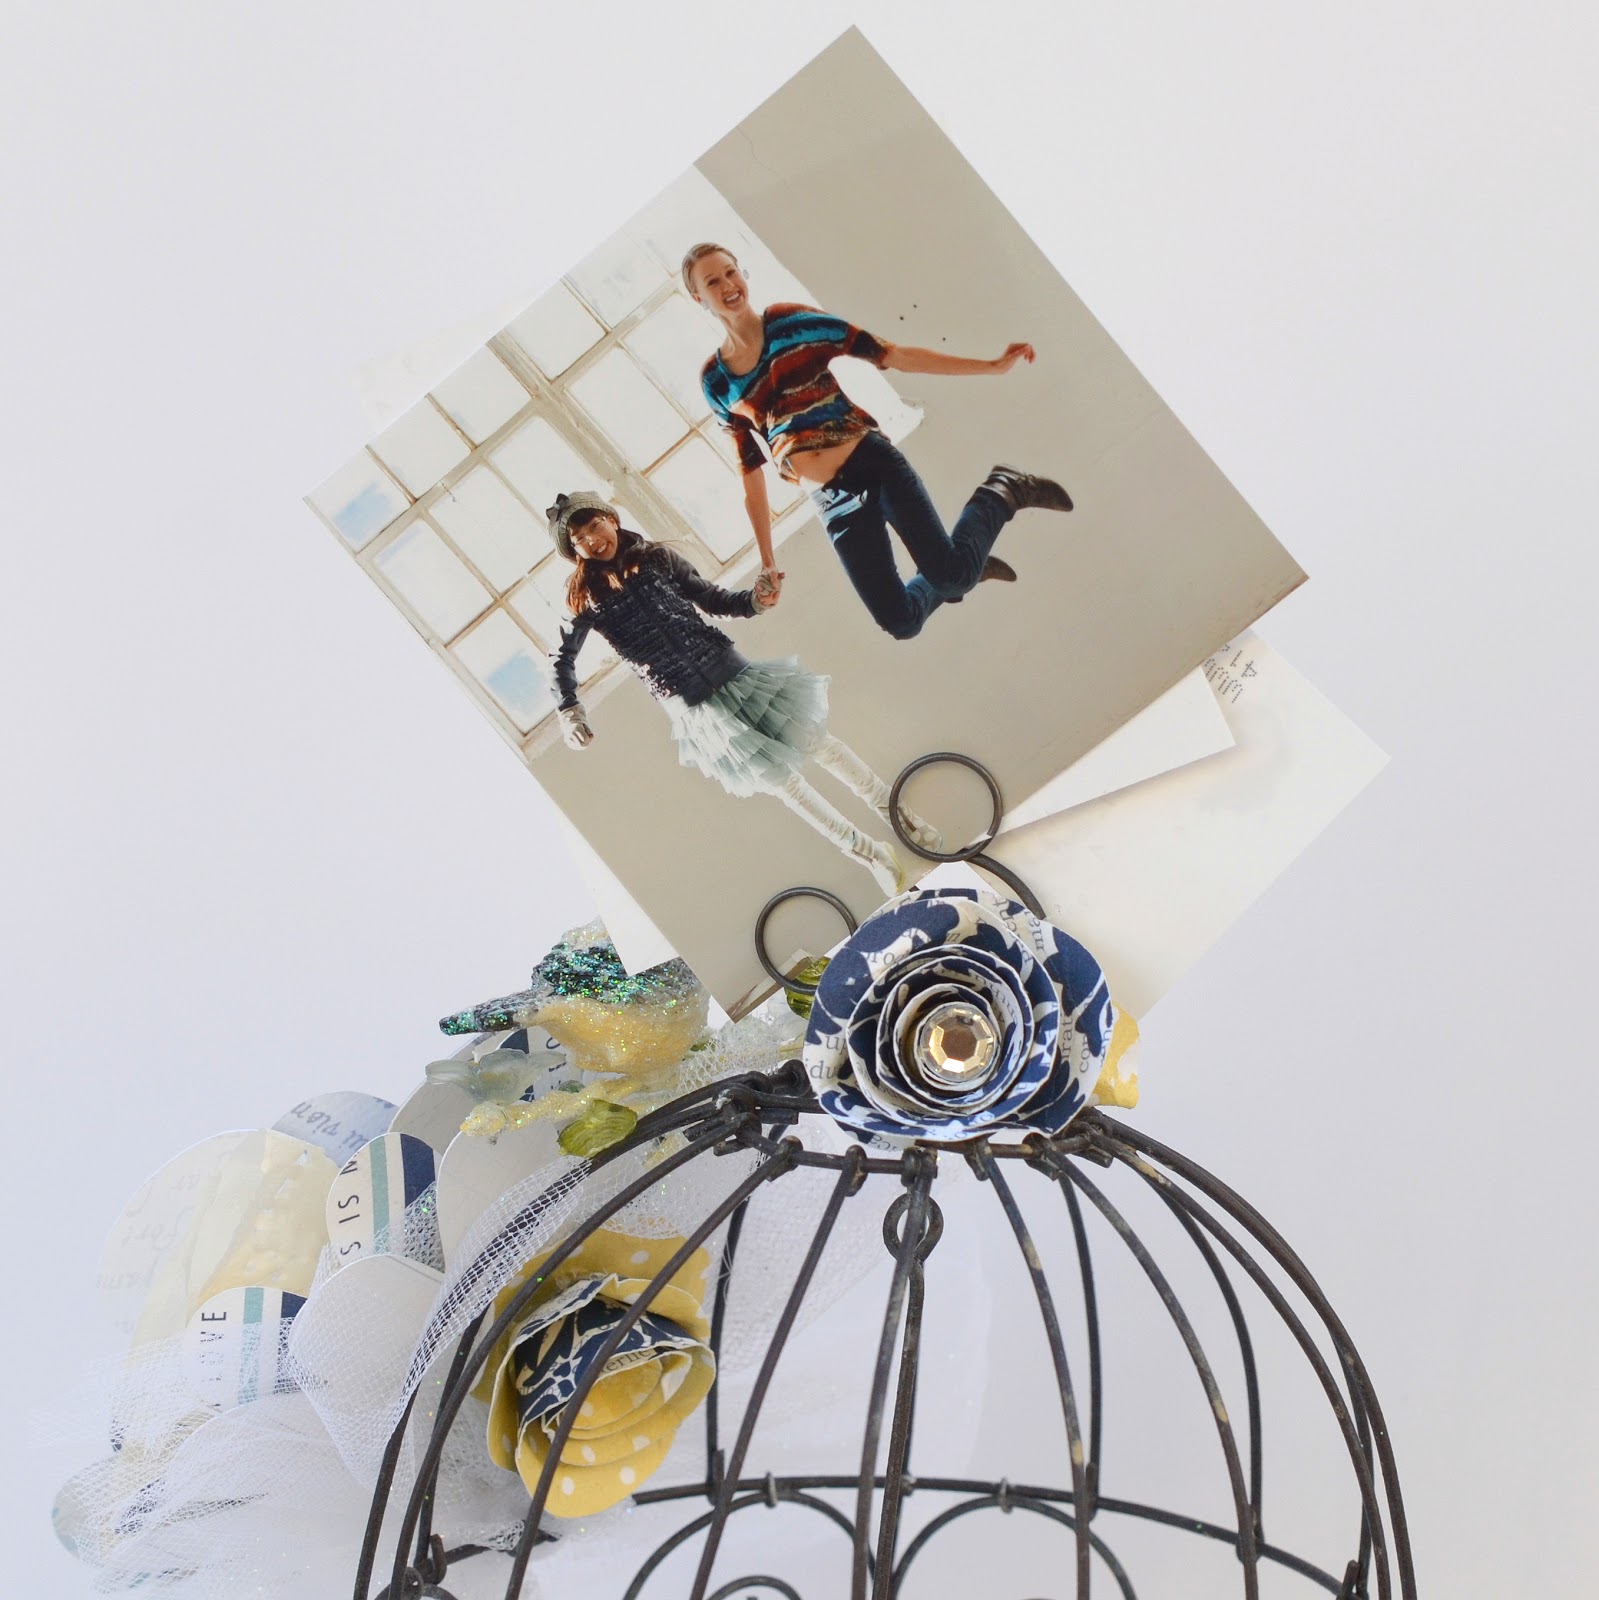
The top of the birdcage has some metal clip photo holders added to the hook that was already there to house my photos.  I love it I can change these out
whenever I want.
The "Everyday Moments" paper line is very fresh for spring!  It has beautiful blues and yellows, and some amazing flowers that are saying "Happy" to me!

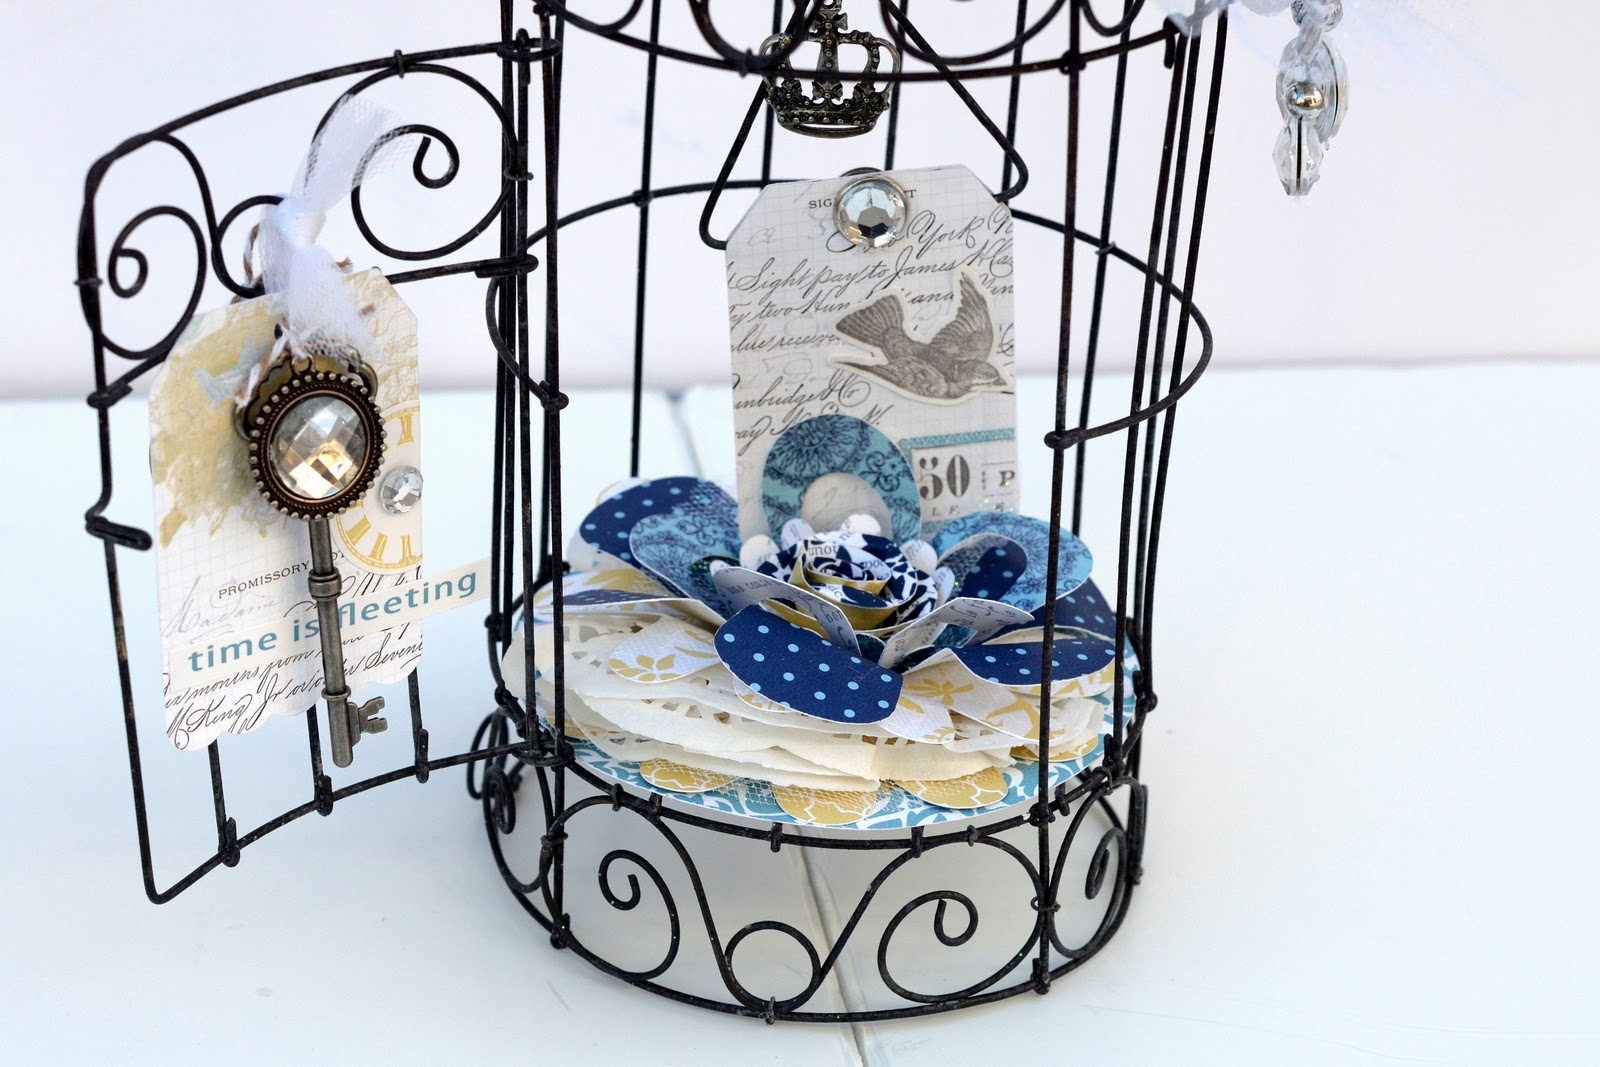
I made a couple large layered flowers using my Cricut and the "Mother's Day Bouquet" cartridge.  It was fun to combine the different papers, and some doilies and tulle to make several layers.  The flowers are large measuring 5.5 inches wide - and have about 6 layers of graduated sizes of paper.  One accents the side of the cage and I placed the other one inside.  The door is swung OPEN because you can see the Bird is outside on top of the cage! The Perch swing that is inside the cage is accented by tags I cut and placed them back to back.  It's very nice that this paper is double sided, so both front and back look beautiful.   I love it that the Sticker sheet in the line has such cute Birds that I added to the tags inside.   I also tied a tag to the open door and used some of the Blingage keys and jewels to make it cute!
You can see this project will have lots of possibility for holding my photos!
The "Everyday Moments" new release is definitely my very favorite and look for it very soon for YOU to create something special!!


Colette's Blog

Wednesday, January 11, 2012

Celebrating 2012 with Colette


I don't know about YOU- but I am always thrilled to start a NEW year!  Not sure if it's the RESOLUTIONS, or a fresh page on the calendar- or maybe cleaning up the clutter from the busy holidays, BUT I love a brand new YEAR!  It always energizes me!!
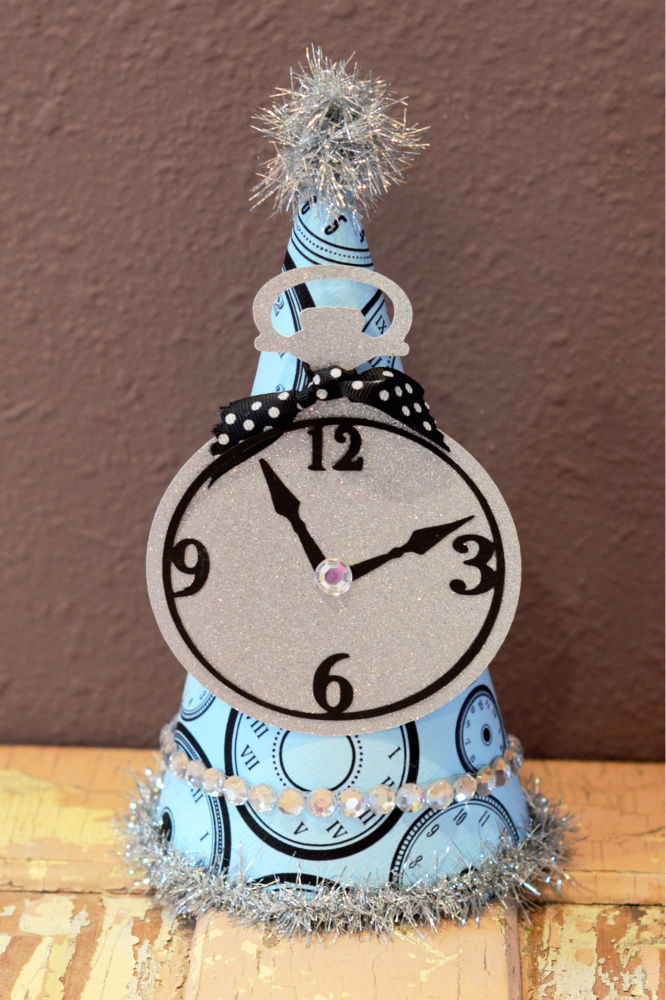
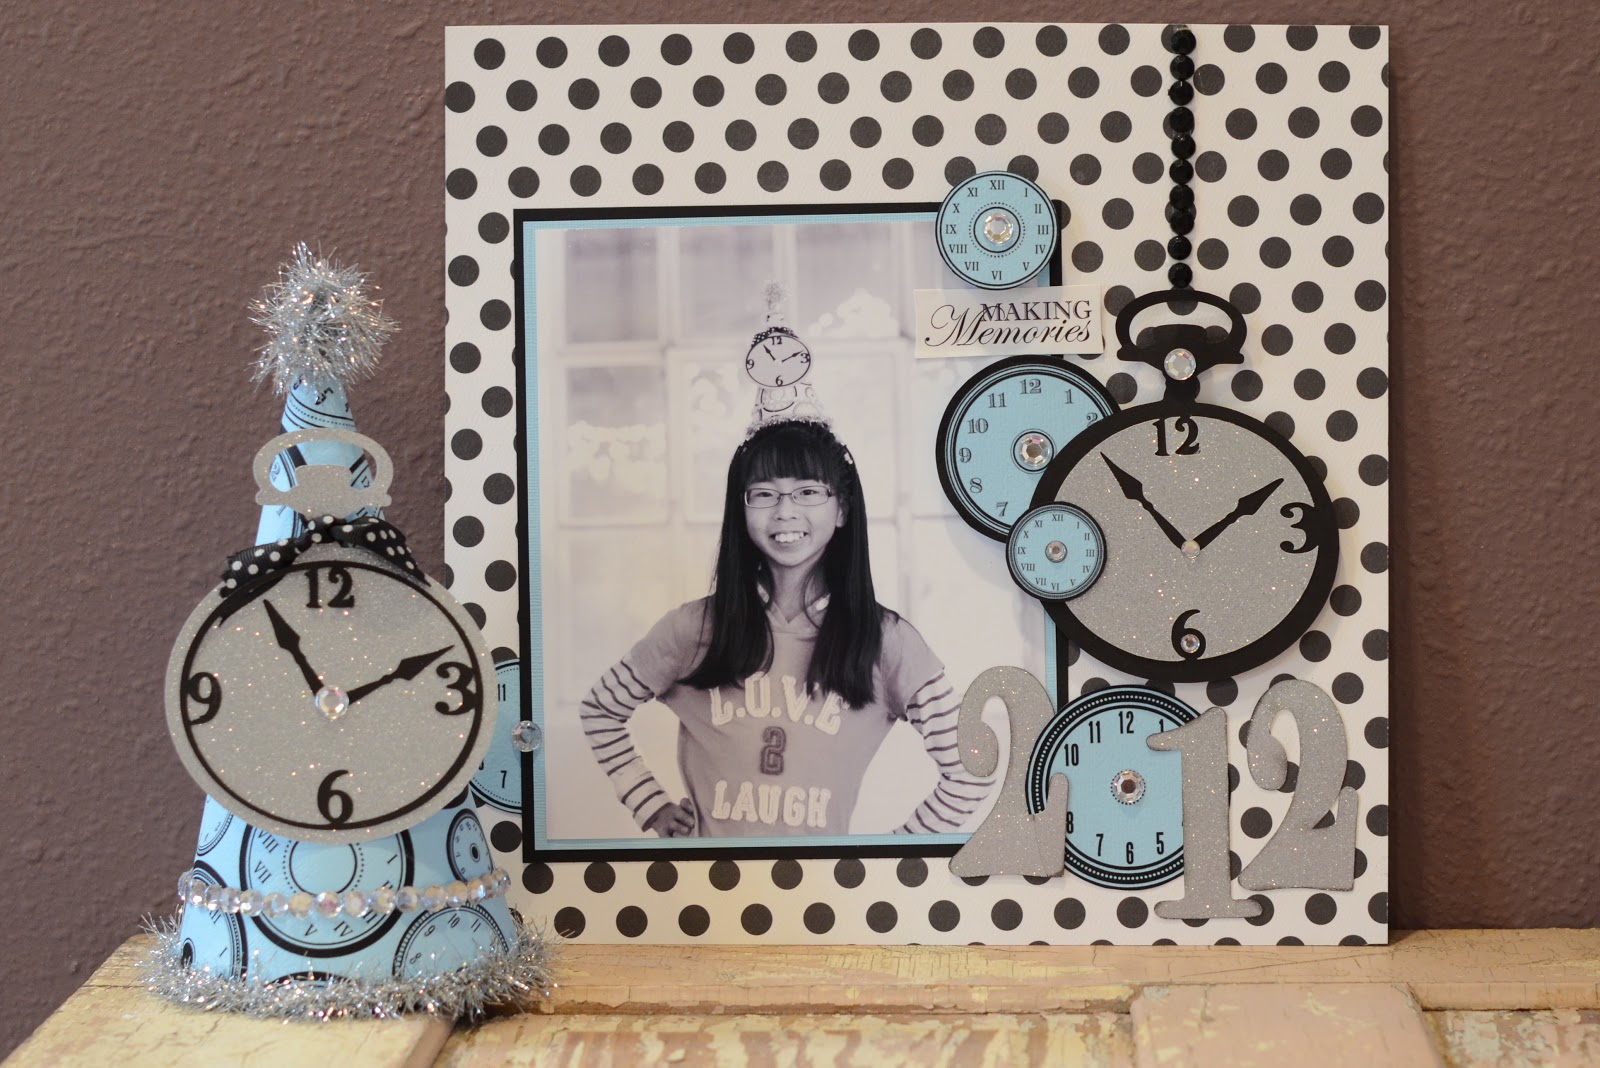
The Teresa Collins  "Sophisticated" cartridge has gotten  alot of use at my house, along with the "Black and White" cartridge I use on my Cricut Imagine!  I have had this CLOCK spotted on the cartridge and knew I would be using it in Honor of the NEW Year.   I had fun making my daughter Jensen a New Years Eve party hat with the 2 cartidges.

I first used the Teresa Collins "Black and White" cart to print out the awesome clocks on the Blue Bazzill cardstock.  I made a cone- shaped party hat and glued it together in the back with Hot glue.  Next I used
"Sophisticated" to cut out the BIG clock with Silver Glitter paper in the Teresa Collins "Haunted Hallows" line.  This clock measures 5 inches tall.  The numbers  were cut from black cardstock and this cartridge makes this super easy to make.

I added some ribbon to the top of the clock and also a strip of Donna's Gems at the bottom edge. (Saved one gem for the middle of the clock.).  I added some tinsel trim and it is a darling hat!
Here's the layout I made with Jensen wearing the Hat on New Year's eve. I was happy to get this photo to a pretty good black and white- since the party had very dim lighting-- but it shows how cute it turned out.


This layout was made with more "Haunted Hallows" glitter paper and black cardstock for the clock.
The blue clocks were leftovers from making my hat so I used them to add dimension and color to the layout.

MY paper base for the layout is Teresa Collins "Carolina Breeze" Gentry paper.  The sticker "making memories" came from this line also.

I also loved using the glitter paper to cut the numbers.  Another wonderful thing included in the cartridge-- numbers and an alphabet so there are lots of variety of components to use.

I wish everyone a fantastic and FRESH new year-- and many blessings in 2012!!

Friday, December 23, 2011

Carolina Breeze Family Tag by Colette


This tag was something I created for the cover of an album I will be making.  I thought I'd share it here as we are "Celebrating" Tags!
This tag features Teresa's latest release called Carolina Breeze .
The supply List:
Carolina Breeze Kayla paper
Carolina Breeze Die Cuts and Stickers
Cricut Expression Machine
Cricut Sophisticated Cartridge
Blingage:  Gentry's Glitter, Donna's Gems
Blingage Alphabet stamp set:  Crown stamp
Black Stazon Ink
Close to My Heart Glue Pen and Pop Dots
Black Ribbon: Michaels
Tim Holtz Tiny attacher

This tag was cut out of the Kayla paper using the Sophisticated cartridge.  This black tag is 5 1/4" tall.
I also cut out a flag shape measuring 4 1/2" tall.  It is cut of the same paper, but I used the patterned side for the flag.  Using the Glue Pen and glitter, I edged the flag in glitter and then glued on to the black tag.
Add a line of Donna's gem pearls across top of flag.
Right below the pearls I added a line of the yellow pennants from the die cut sheet.
The swirl tag is a Die cut.  Darken edges and stamp the crown in the center.  Mount this tag in the center of flag under pennants.
Lastly I added the family sticker and stapled a ribbon to the top of tag.
This little beauty will be such a cute focal point on the album I am making!!

Friday, December 9, 2011

Happy 4 YOU tag by: Colette Nederhoff


I am really a fan of tea stained paper - and the "OLD" look it gives the project.  I wanted an antique look for this tag.  Here's what I used to make it:

Tea-stained tag:  7 gypsies
World Traveler papers: Red Brocade and Black Damask
World Traveler Trims and Decorative Brads
Cricut Expressions Machine
Teresa Collins Sophisticated cartridge
Blingage Stamp Set
Timeless Stamp Set
Blingage:  Jason's metal stars
Jute
Mocha Chalk Ink: Quick Quotes
Foam Pop Up dots:  Close to my Heart
2" scallop circle punch: Fiskars


To create this tag:  
First you want to cut your red shapes using the Cricut and the Sophisticated cartridge.  
The bottom red shape measure 4 1/4"  wide and 2 1/2" high.  The brocade red is slightly smaller to layer over the solid red one. Adhere them together and also add the brads to hold them together. Distress edges with Mocha ink. 
Next I stamped the border with the "Timeless" stamps along the bottom of my tea stained tag.  This large tag measures 6 1/2" tall.  The Red shapes can be added to the tag by popping with foam dots.
Punch a scallop circle and distress edges.  You can stamp any message on this circle.  I used the Blingage alphabet for stamping mine.
I also used a 2nd tea-stained tag to stamp "happy" and cut that out.  
Tie a piece of the World traveler lace trim above your red shapes.  I knotted to the right side and glued the Happy on top of my knot.  
Tie a Metal star on the tag with some Jute and it is ready to tie on a package!! 


Wednesday, November 23, 2011

MY TREE, project by Colette Nederhoff


With the holiday fastly approaching, I wanted a new Christmas decoration for my Mantle!  I am loving the look of Doilies - they seem to be a big trend, so they were the inspiration for my Creation.  I purchased a Paper Mache tree at Hobby Lobby, that measures 16 inches tall.  Here is what that Plain old Mache tree looks like NOW~

Supplies:
16 " paper mache tree : Hobby Lobby
4" white Paper Doilies: Wilton -Hobby Lobby
Sparkle Mod Podge
Teresa Collins Christmas Home Papers: Labels, and Snowflakes
Teresa Collins Christmas Home trims
Teresa Collins Christmas Home 6x6 minipad
Blingage:  Ali's pins, Carols Clocks, Miranda's Jewels, Stephanies Gems, and Ty's stars
Adhesives:  Hot Glue and Glossy Accents
Martha Stewart Scoring tool
Foam Brush

To cover the tree -- I used the Sparkle Mod Podge as my glue and applied it directly to the tree with a brush.  Then I coated the doily with the Mod Podge to seal it on top.  Just layer the doilies to your liking and I even left a few edges loose and curling up to create a  lacy look.
The Papers work wonderful to make "lollies" and stack them for a cute focal point on the tree.  I always love Blingage - so the gems and jewels make the PERFECT ornaments.  These are placed in random spots with Glossy accents.

I love the sparkle and simplicity of this tree and it will look amazing on the mantle!!
Have a Festive Holiday!!


Tuesday, November 8, 2011

Christmas HOME Gift Card Snowman


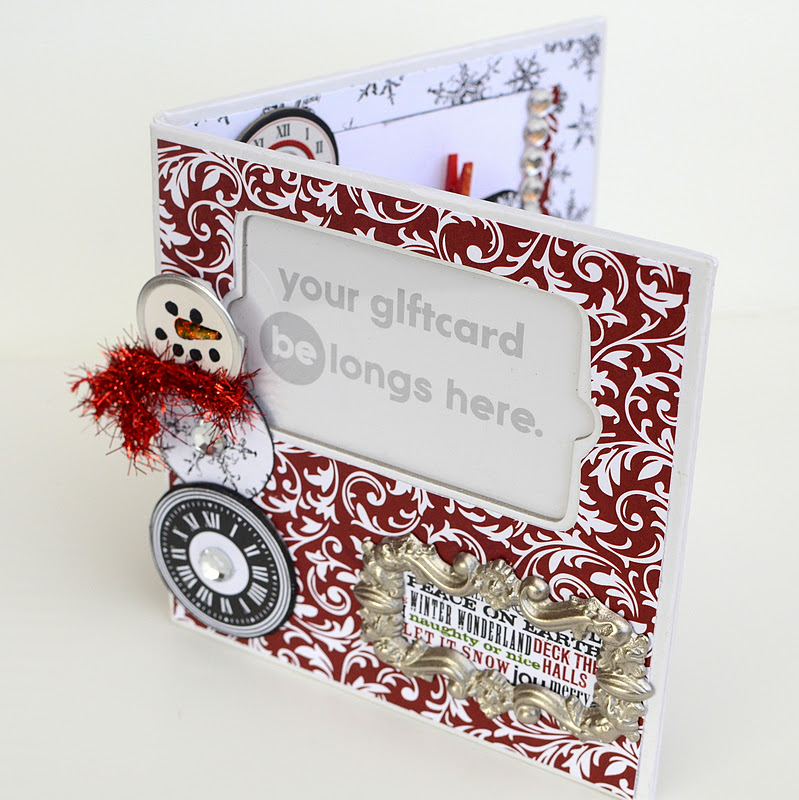
I've been Makin' a List, and Checkin' it twice== and I am thinking there are alot  of people on my list this year who will LOVE picking out their own gifts using a GIFT CARD!  Sometimes, I feel like it's a cop-out-- but this project was a way to give them something I made them, but also get their gift card.  I hope you enjoy seeing this little goodie!

This gift card holder is made by  Creative Imaginations and Is a part of their Bare Elements line.   The front cover measures 5 1/2" X 5 1/2" .  It opens like a book and includes a plastic cover over the place it holds the gift card, so you could easily replace it with a photo after the card has been spent!!  
This little gift card holder will last long after the holidays to enjoy your photos.


The Supply List:
Creative Imaginations Bare Elements Gift card holder
Teresa Collins Christmas Home 6X6 minipad 
Cricut Expressions and Gypsy
Cricut Cartridge:  Teresa Collins Sophisticated and Gypsy Wanderings
Teresa Collins Christmas Home Stamps
Black Stazon INK
Blingage:  Donna's gems & Zac's bookplates
Teresa Collins Christmas Home Trims
Teresa Collins Die Cut clocks
White Doilie:  Wilton
Scallop Scissors
1 1/2" circle punch
Red Clothespin:  Canvas Corp
Adhesives:  Zip Dry, Pop up Dots: Close to my Heart, Glossy Accents 
Black and Orange Markers: Tombow
White metal rim tag: Office Max
Diamond Stickles

Here is the inside of the "book".  I loved the little doillie with the Stamp on it, but you could also handwrite your message or journal on he doillie.
In this next photo, you see I added a photo of my own with the cute little clothespin.

Here is my decorated Back!


The 6X6 mini pad papers where awesome for this project.  There are so many coordinating choices and it was fun to put them together. 
The snowman is very simple to make with a clock at the bottom, a 1 1/2" circle punched for the center, and the metal rim tag as the top.   I used a marker to color the eyes, and also the carrot nose.  The stickles adds the perfect "Sparkle" to the nose! 
I hope you will try making some of these for the People on your Gift Card List-- they will enjoy getting a beautiful and EASY creation with their card.

Wishing you lots of Christmas Crafting.......


Don't forget to take advantage of the great opportunity to purchase the LIMITED Edition Silhouette Advent Calendar, click HERE for information and promotional code.

Friday, August 12, 2011

Christmas Home, Project inspiration by team member Colette

We love how Colette created this amazing home decor piece using the Christmas Home paper line.


Designed by: Colette Nederhof
Featuring: Teresa Collins Christmas Home 


Supplies: 
1  screen door wall hanging - found at Tender Heart Treasures- can use any kind 
    of door you find, or make one and put a door knob on it.  
Teresa Collins Christmas Home Papers: Christmas Ads, Christmas Decor, Calendar and Words
Teresa Collins Blingage:  Amy's Gems, Zac's Bookplate
Cricut machine
Cricut Sweet Treats Cartridge
Adhesives:  Hot glue, Glossy Accents, E-6000
Red Spray Paint : Krylon
Ribbon:  Michaels
Red Book Ring: Michaels
Diamond Stickes


Instructions:
1.  Cut out 13  2 1/2 inch squares from the Ads paper and make cones.  I used hot 
      glue to secure them.  Cones are made by rolling one bottom corner and forming
      a point.   Cut a  3 inch diameter circle of scrap paper to act as a base for the 
      wreath.  Hot glue each cone to the circle by placing the tips in the center of the 
     circle and glueing them around the whole circle having them touch to create a 
      full wreath.  

2.  Cut 2  strips from the same paper - using reindeer side up - strips are 2 inches by 
     12.  Accordian fold them and attatch them together on both ends to make a ring.  
      Flatten the center of the ring- and it will make a flower.  Flatten this flower and 
      glue on top of the wreath you created.  The center of this wreath is one of 
      Amy's gems.   I used E-6000 to glue this since it is metal.

3.  Spray Paint the Zac's bookplate red.   Cut out one of the green decor pieces from the 
      Decor paper.  This is glued under  The wreath on the door.

4.  Cut a very small strip of words from the Words paper to fit in the Zac's bookplate.  
      Glue it inside and then glue it over the Decor piece in middle of the door.
      I applied some stickles glitter to the top of the bookplate and words inside.


5.  Using the Cricut and the Sweet Treats Cartridge- cut out 13 tags from the holly 
     side of Christmas decor paper.  I made these long tags measuring 4 1/2 inches 
     tall and 1 1/2 wide.  Cut out each of the countdown numbers.  Glue the numbers 
     1-12 on the fronts of the tags.  Turn over and glue the rest of the numbers on the 
     back and using the 13th one for the 25th.  Pay attention to the order of these tags
     so as to do the Countdown easily if you are flipping them each day.  They are      hanging on the door handle with a book ring.  I tied a ribbon to accent the book ring.


Thank you Colette for such an amazing project!

Friday, June 24, 2011

Final Day for the Tombow Blog Hop! More inspiration and a giveaway!


This is our final day for the Tombow Blog HOP.
We had such a great time with the Blog Hop we want everyone to stay tuned to see how you can win a great giveaway from both Teresa Collins and Tombow.  But first we have Colette's project.  Look at what she created using products from Tombow and the Notations pages.


Tombow/ Teresa Collins Notations 25th Page
Designed by: Colette Nederhoff
Featuring: Teresa Collins Notations 12X 12 pages and album kit, Tombow Crafty    
                  Collection Retro Markers  

Supplies:
Horizontal 5 X 7 photo
Tombow Crafty Collection Retro Markers
Tombow Blending Pens
Teresa Collins Notations 12X 12 Paper: Take Note and scrap of rulers
Teresa Collins Notations Album kit:  checked tag, and swirl tags
Teresa Collins Notations Album kit: Alphabet stickers
Stickles Crystal glitter by Ranger
Bazzill YellowCardstock
Black Recollections Cardstock
Cricut Expressions machine
Cricut Elegant Edges cartridge
Teresa Collins: Blingage: Collins Keys and Jamie’s Gems
Teresa Collins On the EDge Decorative Brads
Black Zig Marker
Tombow stamp Runner
Tombow 3D foam squares
Glossy Accents by Ranger

Instructions:
1. Color the top border design on the journaling side of the Take note paper with
    The Tombow Retro set and blend them with the blender pen to create different
    shading.  I added some stickles glitter to some special places to create sparkle.  
    The blender pen makes shading really easy!

2.  Mat the 5 X 7 photo first with black cardstock and then the yellow.   Place Photo
     to the left side of layout just under the top line of journaling.  

3.  Cut out 3 frames with the Cricut machine using the Elegant edges cartridge.  The
     large frame measures 4 1/ 2 inches tall and the 2 smaller ones are 3 inches tall.

4.  Cut the Notations TAGS to fit the corresponding openings of the 3 frames.  I used the
    checked tag for the large frame.  I spelled the wording with the Alphabet letters.
     I colored these letters first with blender pen ink soft colors-- and then brushed on
     stickles glitter.  Place the letters on the checked tag when dry and glue frame around
       them.  The frame goes over the top right hand side of photo.  I used the stamp
      runner  to attatch it.

5.  I cut a portion of the swirl tag to fit into one of the smaller frames.  I used a blender pen
      with the Tombow yellow and hot pink markers to color this swirl.    Journal on this
      tag and place below photo  with stamp runner adhesive.

6.  The last frame has a tag inside that has been slightly colored with a blue marker
       using the blender pen.  I also cut a heart out of another swirl tag and colored with
       pink and orange markers.  Add some stickles to the design and after gluing down
       the frame, you can place the heart on it with a 3D foam tab.  It will lift the heart.

7. The Collins Key is attached by tucking it under the ON the EDGE brad at top of frame-
     Over the heart.

8.  The last embellishment is a rose made from the rulers paper.  The center is a Jamie’s
      gem.   Glue down with glossy accents.

Thank you Colette for this amazing project! 
Okay.. with out further a due.  To win a chance at winning a great prize pack from Tombow and Teresa Collins Designs. please leave us a comment letting us know what your favorite color combination that you  like to scrapbook, or a color combination you would like to see.  A winner will be picked at random.  So please leave as many comments as you want but you have to tell us your favorite color combination on each entry.  Good luck everyone.  Don't forget to head over to Tombow's blog. GO THERE now!!! Click {HERE
Related Posts Plugin for WordPress, Blogger...